Tired of exporting multiple clips from Premiere Pro and After Effects, having to set up output settings one by one? Here’s the solution for you:
AfterCodecs has a new “MultiRender” feature that will help you export multiple clips at the same time. It means you’ll only need to click Export and configure codecs parameters once, which is a huge save of your precious time. It also means that once you are set up for a particular timeline, going through this process again (for example when you’ve done some changes and need newer versions of your videos) will be even easier.
Another benefit of our new method is that there’s no room for errors of misconfiguring codecs output settings between the different files; you are guaranteed they will be the same.
The trick we use for now is to put all clips you want to export in the same timeline and write Markers to tell AfterCodecs what portions of the timeline you want to export. It works if you already have the clips directly on your timeline (no need to create another sequence from Clips if they’re already there). If you need to export multiple timelines you can create a new Sequence containing those Sequences and follow the same procedure.
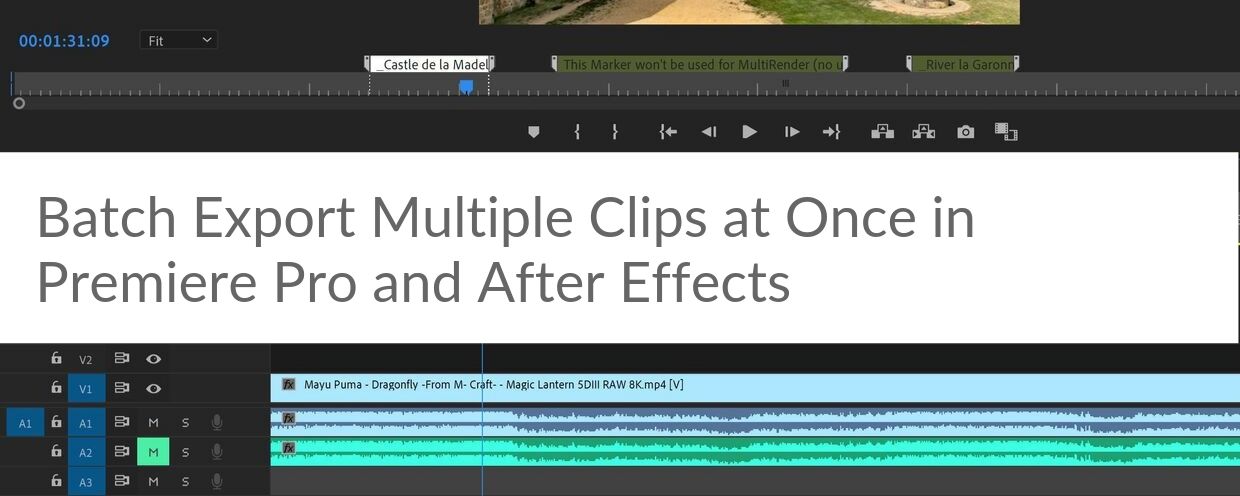
For example, if you have this timeline Premiere Pro :

After using our MultiRender feature you will have rendered those files (Screenshot on Windows Explorer but it also works for Mac OSX) if your output file was MultiRenderMarkersTest.mov :

Now that you know you want to learn how to use this feature, here’s a tutorial for Premiere Pro / Media Encoder and After Effects with screenshots :
MultiRender feature on Adobe Premiere Pro and Media Encoder
So all you need to do is to create new markers like in this screenshot :

And you need to Edit the marker to be able to increase its duration and write its “Comment” section :


You should edit those markers’ “Comment” section and prefix them with an underscore _ to tell AfterCodecs this is a marker that should be taken into account for the “MultiRender” feature. What’s after this underscore will be appended to the filename you choose to export to. The beginnings and endings of your markers indicate to AfterCodecs the ins and outs of when the clips should be exported from. Now your timeline should look like this :
Once ready to export and AfterCodecs correctly installed and licensed (Please use AfterCodecs free 500 frames trial to test it before buying it!), Export your sequence and select “AfterCodecs” in the dropdown format list. Then click on the “AfterCodecs Settings” button and tick the “MultiRender” checkbox; You’re good to go!


And the final result is there in your target output directory :
MultiRender feature on Adobe After Effects
You can already use this feature on After Effects if you just export your composition to Adobe Media Encoder’s Render Queue. It works the same way, your timeline/composition should look like this :

As with Premiere Pro, you need to edit a marker’s duration before being able to drag and drop its ins and outs.
Rendering through Media Encoder is a bit slower but you can do it while you are using After Effects.
This feature hasn’t been done directly from inside After Effects yet, but if you need it, please contact us! AfterCodecs also exists for, After Effects, this might be achievable.
I don’t like having to manually create the markers!
Yes, we know. Please contact us to tell us more about your workflow to see how we can improve on this feature.
Happy editing!
Comments