Universal Audio
-
Compatibility After Effects Please check exact version compatibility under the "COMPATIBILITY" tab below
Always Universal.
Animating or editing in time to music or voice can become a tedious process when working inside precomps, you may end up jumping back and forth between your main comp and your precomps, awkwardly placing markers at key points or copying your audio into your precomps and making sure it's always lined up correctly. Let's not even go into the times when you're working inside comps nested even deeper.
Get audio reference anywhere in your project with one click and never break your creative flow when timing to sound. The audio reference compensates for comp layers that have been retimed, stretch and even time remapped by applying stretch and time remap adjustments onto the reference audio that cancel out any stretch or time remap from within that comp layer. It also maintains any markers from your audio layers and providing several useful options, such as including time indicators on the reference layer, and providing visual reference throughout your nested comps to help you time to an animatic wherever you are.
KBar Support
Any of the Universal Audio buttons can be added to KBar, the functions available to KBar are named universalize, refresh, remove, options and view. This script also comes with icons for the KBar buttons to use.
The Panel
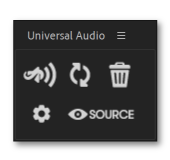
The Universalize Button
Select your audio then click this button and that audio will be placed into a new UA comp, which will then be spread into all the comps layers in your main comp, and timed to exactly line up with that main audio, all the UA layers throughout your project will be guide layers, so you never need to worry about this affecting your final render. Hold ALT while clicking this button and previous UA will remain in place while it adds a new set of UA. Rename the UA comp in the project panel and that name will be used for all UA layers throughout your project, allowing you to have different trees of audio in different comps at the same time.
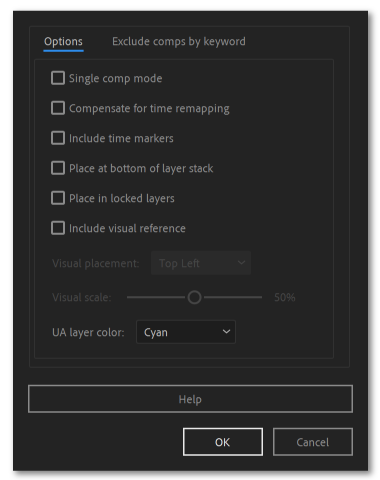
Enable "single comp mode" in the settings and this will behave differently, with single comp mode enabled, UA only gets placed in the currently viewed comp, you no longer need to select any audio, the script works backwards from this currently open comp to pull any audio it finds in each parent comp until it reaches the primary comp, ie. The comp that has not been used in any other comps.
The Refresh Button
Clicking this button will update the timing and settings of all the UA layers so they match any changes you may have made to comps throughout your project.
The Remove Button
Clicking this button will remove all the UA from your project, if you have multiple UA added, then you can hold ALT while clicking this and it will only remove the latest UA.
The View Source Button
Clicking this button will take you to the comp that contains the audio that you made universal, your primary comp. If you have multiple UAs then clicking this multiple times will cycle through the source of each UA, you can also select a UA layer and hold ALT while clicking this and it will take you one comp backwards from the current comp, while also highlighting the layer that the selected UA was pushed into, ie the layer of the comp you just had open, you can use this to step backwards through the audio tree. This button also acts as a handy shortcut to take you to your main comp from wherever you are in your project.
Options
Overview Tutorial
| After Effects | 2024, 2023, 2022, 2021, 2020, CC 2019, CC 2018, CC 2017, CC 2015.3, CC 2015, CC 2014, CC, CS6, CS5.5, CS5, CS4, CS3 |
|---|
1.9.3 (Current version) - Feb 8, 2023
- Updated licensing framework.
1.9.2 - Feb 8, 2023
- Fixed bug where the UA layer was not positioned correcly when "Include visual reference" is enabled and placement set to center.
1.9.2 - Sep 7, 2022
- Fixed bug where the UA layer was not positioned correcly when "Include visual reference" is enabled and placement set to center.
1.9.1 - Aug 23, 2022
- If script is added to KBar without any arguments, the KBar button will open the Universal Audio panel.
1.9.0 - Aug 22, 2022
- Added KBar support and included icons for KBar, the functions available to the KBar buttons are named:
universalize
refresh
remove
options
view
- The panels button layout changes based on panel size.
- Added progress dialog while the script is working.
- If a comp layer is used multiple times in a comp, the UA layer will now always prefer to be pushed into the selected instance (if you double click comp layers to open them, then the comp instance you are working in will naturally be the instance that is selected).
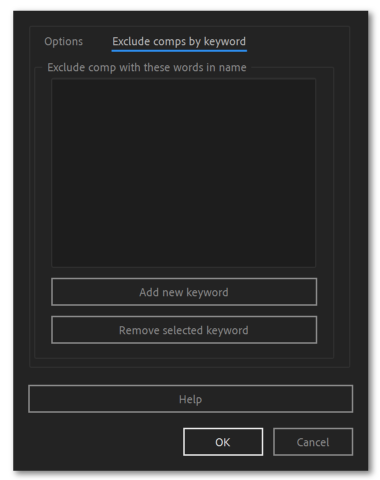
- Added ability to exclude certain comps by keyword, any comp layers with an excluded keyword anywhere in the name will not have UA pushed into them, to add keywords, open options and select the "Exclude comps by keyword" tab.
- You are now able to keep existing UA when you make more audio universal, to do this hold ALT while clicking the universalize button, all existing UA will remain in place and will always act in accordance with the options they had when they were first created.
- If you hold ALT while clicking the remove button, it will only remove the latest UA, otherwise the remove button will remove all UA.
- If you have multiple UAs added, the view source button will now cycle through the source comps of each UA.
- You can now select a UA layer and hold ALT while clicking the view source button, and it will step back one comp as well as select the layer the selected UA was pushed into, useful for quickly navigating backwards through the audio tree and tracing the path of each selected UA.
- Can rename and change the label color of the Universal Audio comps in the project panel and the name and label will be retained after every refresh, Allowing you to rename UA comps as they appear throughout your project.
- UA will stay in their subfolders of the project panel after every refresh, when adding new UA, if some UA already exists, the new UA will be placed in the same folder as the latest UA.
- With visual reference enabled, the scale of the UA layer is now scaled relative to the current comp it is in, so if the visual scale is set to 50%, it will be scaled to 50% of the width of comp that it is in. The visual reference layer will also now be set continuously rasterized.
- Updated license framework.
1.7.1 - Oct 16, 2020
1.7 - Sep 22, 2020
- Updated licensing framework
1.6.95 - Jun 22, 2020
1.6.9 - Jun 19, 2020
1.6.8 - Apr 9, 2020
1.6.7 - Nov 14, 2019
1.6.6 - Oct 21, 2019
- Updated licensing framework
1.6.5 - Sep 3, 2019
1.6.4 - Aug 28, 2019
- Added settings to control positioning and scale of visual reference layer
1.6.2 - Apr 18, 2019
- Fixed UA layer becoming soloed in certain circumstances
- Bug fixes and updated licensing
1.6.1 - Jan 30, 2019
1.6 - Jan 28, 2019
- Added UA color option
- Markers retain their label colors in CC 2019
- Added support for floating licenses
1.5.3 - Nov 5, 2018
1.5.2 - Jun 11, 2018
1.5.1 - May 23, 2018
1.5 - Dec 13, 2017
1.4.1 - Nov 7, 2017
1.4 - Oct 16, 2017
- Interface is now slightly more compact
1.3 - Sep 6, 2017
- Code optimizations
1.2 - Jul 26, 2017
- Added setting to enable/disable placing in locked layers
- Moved all settings checkboxes into separate options dialog to tidy the UI
- Settings are now persistent between sessions
 Adding to cart...
