Characteristic
-
Compatibility After Effects Please check exact version compatibility under the "COMPATIBILITY" tab below
THIS PRODUCT HAS BEEN DISCONTINUED
We recommend Font Manager as an alternative.
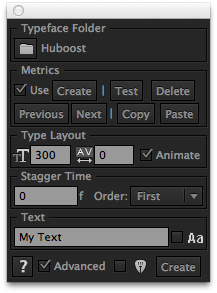
Characteristic simplifies and drastically quickens the process working with animated typefaces. Rather than dragging each character from the project folder to your timeline, simply type out your word(s) and see your animated type on-screen in seconds.
Features
- Set font size and tracking with animatable options.
- Stagger each character with a animatable slider or randomly.
- Automatic font letter spacing with the scripts built-in character detection.
- Slim interface to match the Character UI panel to easily dock behind.
- Case sensitivity option as well as placing the animated typefaces at the current composition time.
Instructions
- Import your animated typeface into a project.
- Select the folder containing the characters and click "Set" in Characteristic.
- Select the font size and tracking amount.
- "Animate" option enables dynamic and keyframable controls.
- "Stagger Time" will offset each character in the timeline. The "order" option controls which way the characters will animate on.
- Type in your text and, if you would like your text to be case sensitive(and your animated typeface supports it) check the "Aa" checkbox.
- To place your text at the current time in the composition check the box next to the create button.
- Click "Create".
- Find the dynamic and keyframable controls inside of the null layer to which all of the characters are parented.
Note: When ensuring all glyph composition sizes match, you can use rd-compsetter to quicken the process.
- To make Characteristic work with your typeface you'll need to setup up its metrics.
- Open up your After Effects typeface file.
- Select the folder that has the complete list of characters and set it as the active typeface by clicking Set in Characteristic.
- View the metrics panel by ensuring the "Advanced" checkbox is enabled.
- Click "Create" to add all of the necessary metric elements to the typeface.
- Open the newly created metrics composition found under your typeface folder. And set the "Guide Baseline" and "Guide Caps" match your glyphs vertical sizing and alignment.
- Set the default width of the typeface by clicking on the Default Grid layer and adjusting the anchor and corner to match.
- Use the "Next" and "Previous" buttons to navigate through the typeface.
- If the glyph does not match the typeface's default width, enable the grid effect on top of the metrics layer and set the anchor and corner points accordingly.
Pre-rendering a typeface
- Select the original typeface folder from which you pre-rendered glyphs from and click the "Copy" button.
- Then select the folder that contains all of the pre-rendered glyphs and click "Paste". Characteristic will copy all metrics data from the original typeface and create all the necessary metrics layers with the copied data.
| After Effects | CC 2017, CC 2015.3, CC 2015, CC 2014, CC, CS6, CS5.5, CS5, CS4 |
|---|
1.5.7 (Current version) - Jul 21, 2015
1.5.6 - Jun 10, 2015
1.4.2 - Mar 1, 2015
Added spinner controls to layout and stagger number inputs
1.4.1 - Jan 6, 2015
Added spinner controls to layout and stagger number inputs
1.3.2 - Jan 15, 2014
Fixed firewall issue.
- 1.2.1 - October 2013
- Fixed localization error.
- 1.1.56 - June 2013
- Fixed localization error.
- 1.1 - Initial release - June 2013

 Adding to cart...


