Workflower 2
-
Compatibility After Effects Please check exact version compatibility under the "COMPATIBILITY" tab below
 Adding to cart...


Workflower 2 is here!
What's new?
(If you bought Workflower 1 in 2023, you get the upgrade for free. Others get a discount. See the upgrade notice for more.)
Of course, you can send me a support ticket, too, ask on our Discord, or post a comment on this page.
Notice for Mac Users & Japanese Windows Users:
There are some limitations for Mac users as well as for Japanese users on Windows. The main limitation is that you can only use a maximum of 20 keyboard shortcuts. Also, if you have keyboard shortcuts applied to other scripts, the number of shortcuts you can use for Workflower functions gets reduced as well. Read up here about the limitations. Please test out the trial first to see whether it works for you.
Workflower changed my life. It can change yours, too.
— Strottman (@ Reddit)I've used Workflower on numerous and complex projects for big brands and agencies and can honestly say, it will enhance your workflow in After Effects like no other tool has ever before.
— Yotam HatzviIt does so many things that should be built into the program, and that are sitting there explicitly requested by people for years.
— Niko Pueringer (Corridor Digital)Let me introduce you to Workflower, one of the best plugins I've ever used!
— David SerranoI use this ALL the time.
— Shok_the_monkey (@ Reddit)I am so in love with Workflower v2. Thank you for creating such an amazing script.
— LIBS Kuro (@ X)I have said it way too often about others in the past (Flow, kBar, etc) but WORKFLOWER is another one of those AE Scripts that Adobe should just fold into the system and make it native if they aren't going to do it themselves.
— Ryan Summers (School of Motion)This is simply the most intelligent and useful toolset I have seen in decades. Well worth the considerable effort required to learn the shortcuts and remember the immense functionality.
— Trevor GilchristThis is really interesting.
— Todd Vaziri (VFX Lead Artist at ILM on Avatar)Such an amazing script. Been using it since the new version launch.
— Stephen MylonasYou are a crazy person who loves pain.
— hopingforfrequency (@ Reddit)I use the Workflower plugin. It takes a bit to get used to. But once you do, it's hard to go back. Highly recommend.
We're all in a very unhealthy love-hate relationship with After Effects. We love it for how intuitive it is. We get a rush when building a beautiful shot. But then ... there are precomps. And then ... there are comps cluttered with too many f*cking layers. And ... these GODDAMN different transforms of layers!
It could be so much simpler. Well, Workflower is here to help and it could be the perfect therapist for our relationship crisis with After Effects. But what can Workflower do for us?
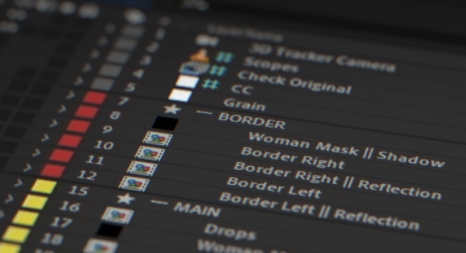
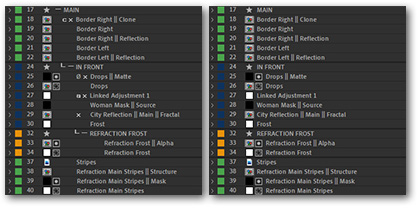
Create Layer Groups
Create Layer Groups
Yes, you heard right! Workflower lets you create groups of layers within your composition. Get ready to organize the hell out of your next project! But you can even do so much more than just creating groups:
Create Groups & Sub-Groups
Collapse & Expand Groups
Select & Move Groups
Parent Group Layers
Disable, Solo & Lock Groups
Relabel Groups
Duplicate Groups
Create Group Mattes
Adjust Group Opacity
Convert Groups to/from Precomps
Group Header trimmed to Layers
... and more!
Like ungrouping, dissolving, and deleting groups. Or creating a group adjustment layer.
Also: Exchange projects with non-Workflower users by converting your comps to a Non-Indented Layout!
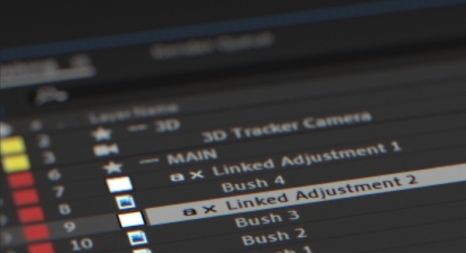
Create Adjustment Layers
only to Selected LayersAdjustment Layers
only to Selected LayersEver wondered why you can't apply an adjustment layer only to certain layers? Well, me too. But wondering doesn't apply an adjustment layer only to certain layers. Workflower does, on the other hand:
Apply Effects!
Workflower will create a layer, onto which you can apply your effects. It will then copy these effects with linked expressions to all previously selected layers.Update!
If you add new effects, change the effects order, or link new layers to the adjustment layer, just hit Refresh to update all linked layers.All linked up!
Visibility of effects is linked by expressions as well. Also, the adjustment layer’s opacity. Or its visibility, too. Magic! (Or just a simple expression. Probably rather the latter. I'm sad now. Say something nice to me.)... and even more!
Use multiple adjustment layers. Convert properties of effects to comp size to account for different transforms of linked layers. Unlink all properties when you’re done working.
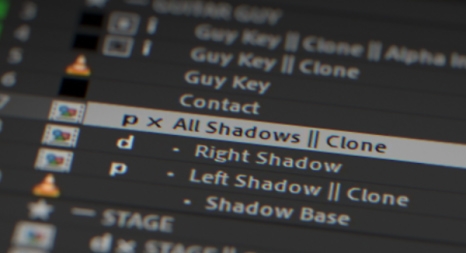
Clone & Precomp Layers
Clone & Precomp Layers
Well, what would cloning and precomping layers be good for, you ask. A shit-ton. You just don't know it yet. What's the most dreaded nightmare when working on a comp? Correct, getting stuff to comp dimensions, so that we can reference it by another layer - to build a lightwrap - or to displace our layers - or to create a matte from them. Or, or, or, ... Our only option then: precomp 'em!
But what about the comp's camera? Or the layers' parents? Or other layers referenced by effects? Or expressions that reference the main comp but not the new precomp? And aside from that: Who likes constantly loosing layers from one’s composition and then having to dig through levels and levels of precomps just to find one layer?
Well, there might be some masochists out there. But for everyone else, there's now: Clone & Precomp!
Clone 'em!
Clone & Precomp will copy all selected layers (or an entire group) to a precomp and link the layers with expressions to their source layers. Parents, camera, lights, and layers referenced by effects will be copied too!
Refresh Connections
If you change non-linkable stuff like adding effects, changing a parent or blending mode, or turning on motion blur, just hit Refresh to update the clone layers.
Prime Clones
In a Prime Clone, a special kind of clone, all contained source layers will be set to 0% opacity while their corresponding clone layers inherit the original opacity.
That way, you can apply effects to the precomp layer and then continue to work on the contained layers.
However, unlike working within a precomp, you will see the changes update including the effects on the precomp layer. Revolutionary! (Maybe not quite like French Revolution revolutionary. But almost.)
You can show the actual layers again, too, by executing Show Clone Layers.
Unlink it!
When you're done working on your Precomp Clone, you can unlink all layers. That will remove the expressions and make your After Effects lightning fast! (Well, okay, so just as fast as your regular layers would be. So maybe like medium lightning speed then.)
... and mooooooore!
Like expression-linked visibility of layers and effects. Or Clones IN Comp (not Precomp ones) that require less refreshing. Or Custom States for Precomp Clone layers. Or Custom Sizes for Precomp Clones. Or other refreshing modes (even quicker ones).
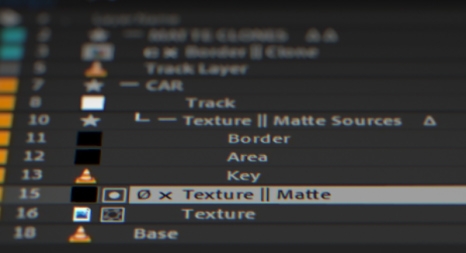
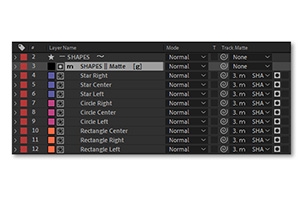
Create & Merge Mattes
Create & Merge Mattes
Matting can be quite confusing. The track matte works great. But what if you want to use multiple mattes at once? Well, there's the Set Matte effect. But what about layers with other transforms? Or ones without Collapse Transformation? Ugh ... It's annoying. That's why Workflower provides different tools for matting:
Create
Now you can quickly create an empty track matte to the selected layer. Or create a matte to multiple layers at once. Neat.
Merge
Merge Mattes will merge several mattes on one track matte. For layers that neither have comp dimensions nor Collapse Transformation enabled, a Precomp Clone will be created - that way they will be fit to comp size and transforms are set correctly!! (Mind = Blown.)
Modify
Calculations effects will be added for every merged matte. That way, you easily change the blending mode (Normal, Stencil Alpha, Stencil Luma, Silhouette Alpha, Silhouette Luma), the opacity, or the order in which the mattes are applied.
New in version 2
New in version 2
Almost a year in the making, Workflower 2 is finally here! It is yet again a massive update and Workflower is now featuring 2x (= 100%) the amount of (handwritten, no A.I.!!!11!11!!1!) code since version 1.0 launched. We all know everyone mostly cares about the size of the code base but for those who are also interested in the features included, here you go:
After Effects 2023/24+ Ready
Workflower is finally After Effects 2023/24+ compatible!
Literally hundreds of sections within the code - across matting-, cloning-, and adjustment layer-functions - had to be completely rebuilt, mostly relating to AE's new track matte system.
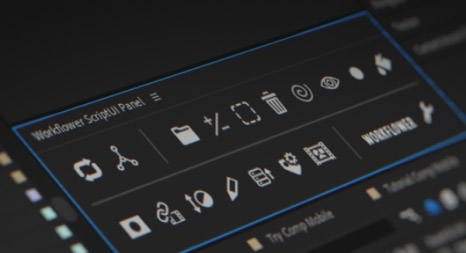
But now you can take full advantage of AE's new track matte system as well as other new AE features (like the Advanced 3D renderer) while at the same time enjoying Workflower's various functions!ScriptUI Panel
Staying true to how After Effects features are supposed to be developed, the most requested while at the same time most basic feature, took the longest to develop ... But here it finally is: The option to use Workflower as a ScriptUI Panel!
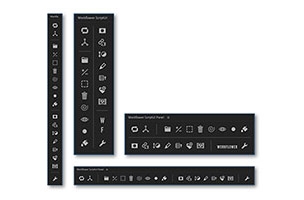
The ScriptUI Panel is resizable and available in 4 different configurations:
1.) Row layout, 1 line
2.) Row layout, 2 lines
3.) Column layout, 1 column
4.) Column layout, 2 columns
You can even customize which buttons are supposed to appear on the panel!Tag Layers & Groups
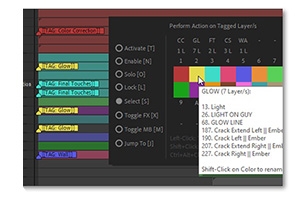
Workflower now features the ability to tag layers. That way, you can create groups of layers not bound by the layer hierarchy and perform various actions on them. You can even tag Workflower's regular groups.
Afterwards, perform an action on a Tag Group:
● Activate / Deactivate
● Enable / Disable
● Solo / Unsolo
● Lock / Unlock
● Select / Deselect
● Toggle effects
● Toggle motion blur
● Jump to top-most Tag Group layer
Improved & Faster Matting Tools
All matting tools within Workflower have been overhauled in a major way to conform to AE 23's Selectable Track Mattes and in turn, are easier to use and execute way faster.
Group Mattes, for example, perform many times faster now since the Group Matte only has to be calculated once, whereas, in AE 22 and below, Group Matte layers have to be applied to every group layer individually, slowing down your comp the more group layers you have.
However, now, you can add as many group layers as you want and AE will stay super fast and responsive! (Well, okay, as super fast and responsive as things were back in 2005. But that's not my fault!)Easier Ways to Learn Workflower
Workflower now provides various ways that help with learning Workflower.
This is especially useful for newer users. However, even older users can find it insightful since they might still learn a thing or two about the functions that way.
The new ways to learn Workflower include:
● Extended tooltips
● Pop-up tips when first executing a function
● Direct links to user guide & tutorial chapters when right-clicking on a function
Double-Click to Expand/Collapse Groups
Expanding and collapsing groups never has been easier: Now you can simply double-click on a group header to expand/collapse the group!
Also:
● Alt/Option+double-click to select
● Shift+double-click to enable/disable
● Ctrl/Cmd+Shift+double-click to solo
BAM!!!
(Needs the WQ plug-in installed that can be found in the installation files.)
But wait, there's more!
● Relabel Keyframes using the Relabel Panel
● Reveal ALL Opacity Properties (e.g. from Effects or other Properties) in the Timeline using Reveal Layer Opacity
● New Functions: Trim Layer to Keyframes & to Layer
● Precompose Super-Duper-Mega-Charged:
Precompose each Selected Layer, Add Handles, Adjust Duration to Layers when Leaving all Attributes, etc.
● ...and so much more!
Also: Check out what was new in v1.1! (Also please click for the stupidly time-consuming promo trailer I produced and I don't want it to disappear just because the version isn't advertised anymore on here. So please, please click!!)
If you're eligible for an upgrade discount, please make sure you are logged into the same account and you will see the discount pricing automatically (this does not apply for the free upgrade, see note below). If you need any help, please open a support ticket. Here's what the upgrade costs: V2 Upgrade Notice
- If you purchased Workflower 1 before October 18, 2022 (the release of AE 23), the upgrade costs 59.00 $.
- If you purchased Workflower 1 between October 18, 2022 and January 1, 2023, the upgrade costs 29.00 $ (this includes everyone who bought it during the Cyber Week).
- If you purchased Workflower 1 after January 1, 2023, the upgrade is free! Please note: Unfortunately, AEScripts can only accommodate two upgrade prices (and we have three prices including the free one), that's why you need to put in a discount code on checkout to get the upgrade for free. Please send me a message via this pre-filled support ticket in order to request the discount code. Make sure to fill in the name/organization to whom the purchase of Workflower 1 was billed so I can verify the purchase.
Work quickly with Shortcuts!
Work quickly with Shortcuts!
Workflower has been designed to be used with shortcuts, so you can work as quickly as possible. Shortcuts can be applied to more than 40 (!) functions.
Compatibility
Compatibility
Workflower is compatible with:
- After Effects 2024
- After Effects Beta *
- After Effects 2023
- After Effects 2022
- After Effects 2021
- After Effects 2020
- After Effects CC 2019
- After Effects CC 2018
It works on Windows and Mac. However, for Mac users as well as for Japanese users on Windows, there are a few limitations. Read up here for more information.
Projects created with Workflower can be easily exchanged between Windows and Mac. Please read the F.A.Q. section on Can projects be exchanged between Windows and Mac without problems? for more information.* Workflower's comp layout is currently not compatible with the new Spectrum UI in AE's Beta on Windows
KBar Support!
As of version 1.0.4, Workflower supports the use of KBar buttons for almost all functions. Click here for instructions on how to set it up.
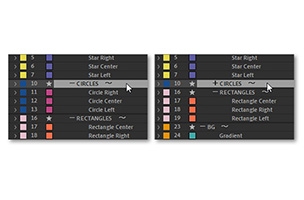
Exchangeable with Non-Workflower Users
An After Effects user that doesn't own Workflower can easily open up a project created with Workflower without any issues!
However, it's recommended to use Workflower's batch-conversion function to convert your comps to one of the Non-Indented Layouts before handing over the project so the non-Workflower user doesn't have to deal with the indented layer names.
Please read the F.A.Q. section on Can I open up a project that was created with Workflower when I don't have the script? for more information.
Left: Indented Layout; Right: Layout without Indent
Compatible with Add-Ons that Depend on Specific Layer Names
Some After Effects add-ons require that certain layers have a very specific layer name. In order to keep these add-ons functional, Workflower allows you to exempt their layer name from indentation.
Please read the F.A.Q. section on Will Workflower's comp layout break scripts/plugins that depend on specific layer names? for more information.
Try it!
Try it!
There is a free trial version available which is usable for 10 days. It is almost fully functional and only has a few limitations. The following functions are deactivated:
- Quick Refresh Connections (A faster mode to refresh Precomp Clones. However, you can still use the regular Refresh Connections function.)
- Matted Adjustment Layers (An alternative to the Workflower's regular Adjustment Layer to Selected Layers.)
- Layer Storing (Often used layers can be stored and then pasted again using a shortcut. So it's some kind of an extended clipboard. With multiple store spaces!)
- Rename Layers by Number
User Guide
User Guide
Workflower has an extensive User Guide, detailing every function. Check it out!
Tutorials
Tutorials
There are several tutorials available, covering every core function of Workflower. Don't feel overwhelmed, though. You don't need to watch all tutorials to get started! Simply choose what you're interested in. For example, just watching most of the Groups tutorial would be enough to get you started:
Tutorial 1: Overview
NOTE: If you want to go straight into learning more in-depth about Workflower, you can also skip this tutorial, as I will be teaching everything from scratch in the other tutorials. However, if you still want to get a basic overview of the functions and/or just a very quick start on how to use Workflower, this tutorial is for you.
Tutorial 2: Installation & Using the ScriptUI Panel
Tutorial 3: Groups, Renaming & Relabeling
IMPORTANT: As of version 2.0, due to AE now occupying Shift+J & Shift+K, the default shortcut for 'Parent Layers to Group' has been changed to Ctrl+Alt+3 & for 'Set Parent Exception Layer' to Ctrl+Alt+Shift+3.
Tutorial 4: Precomp Clones & Clones in Comp
Tutorial 5: Creating & Merging Mattes
IMPORTANT: Please note that Workflower's matting tools (creating mattes, group mattes & multi-layer mattes, as well as merging mattes) work a bit differently in AE 23 and upwards. So if you're using AE 23 or upwards, make sure to watch the section about matting in the tutorial on Workflower v2.0 in addition to this tutorial.
Tutorial 6: Adjustment Layers & Storing Layers
Tutorial 7: Version 1.1 New Features Overview
Tutorial 8: Version 2 New Features Overview
NOTE: Please note that the sections 'How to Install' as well as 'ScriptUI Panel' are almost identical to the sections in the 'Installation' tutorial which was updated with the release of version 2.0.
After Effects 2024, 2023, 2022, 2021, 2020, CC 2019, CC 2018 2.0.4 (Current version) - Jan 15, 2024
[ADDED]
- Full compatibility with the new 'Advanced 3D' renderer, introduced in AE 24.1.
- 'Rename Layers by Number' lets you now define by what increment you want to renumber as well as to keep a certain suffix. To do this, go to 'Settings > Naming > When executing Rename Layers by Number:'.
- 'Rename Layers by Number' now also works on project panel items. Make sure to have no layer in your current comp selected, then select your project panel items and execute 'Rename Layers by Number'. IMPORTANT: This will only work when you execute the function from the menu (not via shortcut).
- You can now duplicate project panel items by selecting them and executing 'Duplicate Layer / Clone / Group'. When you duplicate a comp, it will open the timeline of the duplicated comp and make all its 'Precomp Clones' independent. IMPORTANT: This will only work when you execute the function from the menu (not via shortcut) AND you don't have any layers in your currently active comp selected (otherwise Workflower will duplicate the selected layers)!
- When executing 'Paste Stored Layers' while 'Precomp Clones' are within the selection, Workflower will now create unique 'Precomp Clones' and potentially update contained 'Dependent Clones' to the new clone comp.
- 'Clones' and 'Stored Layers' folders in the project panel will now be identified solely by their name and not their item comment. This makes Workflower compatible with add-ons that rely on folder item comments (like 'Pro IO').
- [Beta feature]: It's now possible to add layer comments without Workflower overwriting them. This also makes Workflower compatible with a variety of add-ons that rely on writing/reading data to/from the layer comments (like 'Flatten Layers' or 'AutoSway'). Workflower achieves this by saving its data to a layer marker when a non-Workflower layer comment is added. Do not remove this marker! Using non-Workflower layer comments can reduce performance of Workflower functions, so it's recommended to use as few as possible. To return to Workflower using layer comments in order to store data, just put in an empty string into the layer comment and execute any Workflower function. Since this feature is still in beta, you have to enable it under 'Settings > Layout > Allow External Layer Comments'.
- When right-clicking on some functions on the main menu (like matting-, cloning- or naming-functions), you can now access the dedicated settings page directly.
- You can now quickly access the 'Convert all Comps to another Layout' function by right-clicking on empty space on the ScriptUI panel and choosing 'Export/Import Project'.
- When an error occurs, you can now send a support ticket on the spot, directing you to a pre-populated contact form.
- When you execute a function that requires an active comp and there is no active comp, you will now get an error.
- Added the function 'wfAPI.refeshLayouts(comps[, doNotLabelLayersOutsideToNone])' to the scripting API. This allows you to refresh the layout of several comps at once, making the overall execution faster.
- Added the functions 'wfAPI.isInTagID(layer, tagID)' and 'wfAPI.isInTagName(layer, tagName)' to the scripting API. This checks whether a given layer is within a tag group with either a certain ID (0 - 16) or name.
[CHANGED]
- When 'Refresh Layout' or 'Rename Layers by Number' renumber layer names, Workflower now doesn't add a space between the original name and the new number when the last character is a '0' or a symbol like '_'.
- When you execute 'Rename Layers by Number', Workflower now will try to find a unique name for each selected name *after* the entire renaming process took place.
[FIXED]
- Fixed a bug when executing 'Reveal Layer Opacity' that would falsely reveal other properties on a layer.
- Fixed a bug that occurred when showing/hiding 'Prime Clone' layers and properties on a layer's effect were hidden (e.g. in certain circumstances on 'Element 3D' and others).
- Fixed a bug that would occur during 'Refresh Layout' after a 'Precomp Clone' was moved in time and its keyframes became negative.2.0.3 - Nov 4, 2023
[ADDED]
- Compatibility with After Effects 2024.
- The 'Layer Tagging' panels now feature buttons that let you switch between 'Tagging' and 'Performing'.
- You can now apply keyboard shortcuts to 'Trim Layer to Keyframes' and 'Trim Layer to Layer'.
- When moving 'Precomp Clone' layers in time and executing 'Refresh Layout', the keyframes on the 'Precomp Clone' layer will now stay exactly where they used to be relative to comp time.
- Unless a 'TTT' marker has been added, 'Dependent Clones' will now adjust during 'Refresh Layout' to the in/out of their contained layers too. When executing 'Duplicate Layer / Clone / Group', a 'TTT' marker will be added automatically to the 'Dependent Clone' (you may change this behavior in the 'Cloning Settings'). Remove the marker to make use of the automatic trimming. Since the automatic adjustment of a 'Dependent Clone's' in/out point would break legacy comps, a trim exception will be added to all 'Dependent Clones' upon executing any Workflower function on any comp created with Workflower v2.0.2 and lower.
- The speed when using 'Add / Remove Layer References' while having two layers selected in order to set an effect layer control dropdown has been improved.
- Improved the speed of 'Reveal Layer Opacity' when the layer contained a lot of keyframes.
- Ability to limit the calculation of the layer size/s during cropping in 'Precompose' to comp size (enabled by default). This will speed things up when you know that the layers to be precomposed are within the bounds of the current comp. When layers stretch beyond the comp size, please disable this checkbox.
- Added the parameter 'doNotLabelLayersOutsideToNone' to 'Refresh Layout' in the scripting API. Call it like this: wfAPI.refreshLayout([comp, doNotLabelLayersOutsideToNone]). This sets the current comp to not label layers outside groups to 'None'. Default is false.
[CHANGED]
- To make room for the new shortcuts on the shortcuts panel UI, 'Store Layers 4' and 'Paste Stored Layers 4' have been removed. You can still access these functions using KBar.
- When duplicating groups or layers using 'Duplicate Layer / Clone / Group' and the group/selection contains 'Precomp Clones' as well as corresponding 'Dependent Clones', the source comp of the duplicated 'Dependent Clones' will now be set to the duplicated 'Precomp Clone' source comp.
- When creating a 'Group Clone' and NOT choosing 'Prime Clone', the created 'Precomp Clone' will now be disabled by default since the clone will generally only be used to be referenced by an effect or a 'Dependent Clone' of it will be the layer that's actually visible.
- When performing 'Toggle Motion Blur' on a 'Tag Group', and a contained layer holds a motion blur effect ('Pixel Motion Blur', 'RSMB', etc.), the layer's motion blur switch will now be toggled on/off too in addition to the effect.
[FIXED]
- Fixed a bug that would prevent 'Essential Properties' of the same type (e.g. text) from being referenced properly in a 'Precomp Clone'.
- Fixed a bug that could occur when trying to unprecompose layers in certain situations (e.g. when the precomp was within a 'Group Matte').
- Fixed a bug that would additionally precompose the 'Group Matte' layer when a layer within a group with 'Group Matte' was precomposed.
- Fixed a bug that would occur when creating a group with the new 'Advanced 3D' renderer selected in AE's beta.
- Fixed a bug that could create a 'Missing Font' error upon reopening a project file created with Workflower.
- Fixed a bug that would accidentally execute some functions twice when executed from the ScriptUI Panel.
- Fixed a bug that would use a wrong date naming format for log files.
- Fixed a bug that could falsely create a mov file titled '[WF] Interpretation Reference' in the project panel when opening Workflower's settings.2.0.2 - Jun 30, 2023
[FIXED]
- Fixed a bug that would generate an error after applying a layer name using 'Rename Layer/s'.
- Fixed a bug that would create an expression error on a text layer's 'Source Text' property in a 'Precomp Clone'.2.0.1 - Jun 26, 2023
[ADDED]
- The ScriptUI Panel now uses smaller buttons by default. To revert back to larger buttons, right-click on any button and select 'Use Large Buttons'.
- On the ScriptUI Panel, center-clicking on empty space will now execute 'Refresh Layout'.
- [WF beta feature:] Compatibility with proper 3D objects (GLB, OBJ, etc.) using the 'Mercury 3D' renderer in AE's beta. Since those objects can't contain effects, no effects will be added when the layer is a 'Group Opacity Layer', 'Prime Clone Layer', 'Clone in Comp Base' or 'Matte Layer'. Instead, control the opacity of a 'Group Opacity Layer' by clicking on the original opacity property; Control the 'Prime Clone Layer' opacity from the 'Custom Opacity' Slider on the layer's corresponding effect on the 'Precomp Clone'; Control the 'Clone in Comp' properties from the clone itself; Control the 'Matte Layer' properties from the 'Matte Merge Layer Effect'. Also: 'Mercury 3D' objects can't set track mattes, therefore, when adding a 'Group Matte', you might want to create a 'Prime Clone' of your contained 'Mercury 3D' objects first before creating the 'Group Matte'.
- [WF beta feature:] Ability to change the comp's renderer from 'Mercury 3D' to 'Classic 3D' after having created a 'Prime Clone' containing 'Mercury 3D' objects in AE's beta. When you execute 'Refresh Connections' on a clone that contains 'Mercury 3D' objects, the clone's renderer will be always set to 'Mercury 3D' regardless of the source comp's renderer. This enables you to work with proper 3D objects while being able to use blend modes, track mattes, etc. on non-'Mercury 3D' layers in your comp.
- When re-assigning a 'Tag Group' and the newly selected 'Tag Group' already contains layers, you can now choose to either merge or swap both 'Tag Groups'.
- On Workflower's shortcuts panel, you now have the ability to export and import shortcuts to/from a txt file.
- You can now assign shortcuts that contain the 'Tab' key on Workflower's shortcuts panel.
[CHANGED]
- When merging while re-assigning a 'Tag Group', the newly merged 'Tag Group' will now always take on the name of the tag that it was re-assigned to.
[FIXED]
- Since AE will display scripting progress bars as of 23.5, Workflower will now disable them automatically during Workflower's execution on Windows, and guide you to disable them on Mac. (The automatic disabling mechanism seems to fail on Mac at the moment. Hopefully, this will be fixed in the future.)
- Circumvented permissions issues that could prevent shortcut slots from being installed on Mac. Now, an alternative method to install the slots will be used when the original one fails.
- Fixed a bug on Mac or when using 'Individual Scripts Mode' on Windows that prevented the user, in certain circumstances, to be informed correctly to set a shortcut for the 'Main Menu' when there was none.2.0 - May 12, 2023
FINALLY AE 23+ COMPATIBLE!
Attention: If you want to open up a project created in AE 23 + Workflower v2 with AE 22 or below, you have to downgrade your project by going to 'Settings > Layout > Convert Project to older WF/AE Version'.
[ADDED]
|| ScriptUI Panel ||
- Option to use Workflower's 'Main Menu' as a ScriptUI Panel. Install 'Workflower ScriptUI Panel.jsxbin' into AE's 'ScriptUI Panels' folder. Please note that it is still mandatory to additionally have '--- Workflower ---.jsxbin' installed in AE's 'Scripts' folder.
|| Matting ||
- All matting tools (creating single/multi-layer mattes, creating 'Group Mattes' & merging mattes) now conform to AE's new 'Selectable Track Matte' system (introduced in AE 23). Especially 'Group Mattes' benefit significantly, making them many times faster. When, within a 'Group Matte', existing track mattes have to be merged or you reference another matte layer (like the group header), an 'Intermediate Matte Merge' (Inter-Merge) has to be added above the 'Group Matte Layer' that is being used as track matte for group layers. Read the updated user guide chapter on matting for more information.
- If you create a 'Matted Adjustment Layer' to a single Layer in AE 23 and up, an adjustment layer with a track matte set to the selected layer will be created (instead of an additional clone).
- When you execute 'Create Matte' on a single layer while having a 'Set Matte' effect on the layer selected, now the created matte layer will NOT be used as a track matte but the 'Set Matte' layer control will be set to the new matte layer instead. This also works for other effects too, e.g. to create to depth map layer to a 'Camera Lens Blur' effect. Please read the user guide chapter on 'Matting' for more information.
- 'Invisible Mattes' now display the icon ‡ for easier detection of the layer type.
- 'Matte Clone Collection Groups' will now get deleted if there are no clones within anymore once upon executing 'Merge Mattes'.
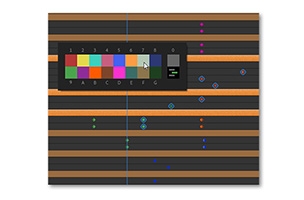
|| Relabeling ||
- Using 'Relabel Layer/s', you can now affect keyframe label colors, too (introduced in the AE 22.6). Instead of layers, select keyframes and execute 'Relabel Layer/s'.
- When keyframes are transferred (for example when Workflower adds a special opacity slider to apply group opacity), keyframe label colors are now transferred as well.
- Now, when you have keyframes selected and you execute 'Select Group', all keyframes of the selected label color will be selected.
- When using the relabel panel with keyframes selected and you hold down Ctrl+Alt (Win) / Cmd+Opt (Mac) while clicking on a label color, all keyframes in the current comp with the old label color old the selected keyframe will change to the new one.
- On the relabel panel, you can now press keyboard shortcuts to quickly apply label colors (0 - 9, A - G).
|| Learning ||
- Extended tooltips with additional info when hovering over function buttons. You can also disable the extended tooltips under the 'Miscellaneous' settings tab.
- Ability to disable any kind of tooltip on the 'Main Menu'. To do this, go to the 'Miscellaneous' settings tab.
- When first executing certain functions (like creating a group), Workflower will now display useful tips about the functions.
- When you right-click on any function in the 'Main Menu', a menu will open with links to the user guide and video tutorial chapter on the function.
|| Layer Tagging ||
- New functions: 'Tag / Untag Layer/s' & 'Perform Action on Tagged Layer/s'. Tag layers and groups with a specified label color by using the 'Tag / Untag Layer/s' panel. Afterwards, use 'Perform Action on Tagged Layer/s' to execute any of these actions on them: activating (= enable & solo if necessary), selecting, enabling, soloing, locking, toggling effects, toggling motion blur & jumping to the top-most layer of a 'Tag Group'.
- New functions: 'Activate / Deactivate Tag Group 1 / 2 / 3': (De)activate 'Tag Group 1', '2' or '3' quickly without the need for first opening up the 'Perform Action on Tagged Layer/s' panel. 'Activate / Deactivate Tag Group 3' only available via shortcut.
|| Group Functions ||
- Now you can expand/collapse a group simply by double-clicking on a group header. Select a group by Alt/Option+double-clicking, enable/disable by Shift+double-clicking, and solo by Alt/Option+Shift+double-clicking. Only works when you have a single group header selected. For multiple groups, use Workflower's dedicated functions. For the double-clicking behavior to work, you need to have the WQ plug-in installed that's provided in the installation files. Read the installation instructions on how to set it up.
- When you execute 'Ungroup Layer/s' on a group-less layer, it will now be moved after the next group.
- When you create a group of a single layer, Workflower will now suggest the layer name as group name.
|| Trimming ||
- New function: 'Trim Layer to Keyframes' (Ctrl/Cmd+click on 'Paste Stored Layers' button / Not available via shortcut).
- New function: 'Trim Layer to Layer' (Alt/Option+click on 'Paste Stored Layers' button / Not available via shortcut). With two layers selected, trims 2nd to 1st selected layer. With more than two layers selected, either trims to 1st layer, or trims 1st layer to other layers.
|| Precomposing ||
- When using Workflower's 'Precompose' while having multiple layers selected, you now have the option to create a precomp for each selected clip.
- When using Workflower's 'Precompose' and having checked 'Adjust Composition to the Time Span of the Selected Layers', you can now add handles before and after the precomposed clip/s.
- When using Workflower's 'Precompose', you now have the option to choose 'Leave only Transform Attributes' if you have a single layer with a source item.
- When using Workflower's 'Precompose' with 'Leave all/only Transform Attributes' checked, you can now choose to 'Adjust Composition to the Time Span of the Selected Layers' too.
- When executing 'Precompose' while having a precomp layer selected, you can choose to rig multi-pass layers from the precomp's contained layers (still experimental!).
|| Naming ||
- When you execute 'Rename Layer/s' while having a layer property selected, the selected layer will be renamed to the property name, e.g. to the selected mask name. (Please note that this is disabled by default. Enable it by going to 'Settings > Naming > When Property is selected while executing 'Rename Layer/s', rename Layer to it'.)
- Group elements ('Group Mattes', 'Group Inter-Merges', 'Group Adjustment Layers' and 'Group Clones') will be renamed to their group header name automatically within 'Refresh Layout'. You can also deactivate this in the 'Naming Settings'.
- 'Matte Merge' layers will be renamed to their matted layer name automatically within 'Refresh Layout'. You can also deactivate this in the 'Naming Settings'.
|| KBar Integration ||
- Now you can execute *every* Workflower function from KBar. (4 previously not available functions were added + 7 functions introduced in v2.0.) Check out the user guide chapter on 'Installation' for more.
- When installing a WF KBar Toolbar from the 'Layout Settings', the buttons will now be installed *without* modifier keys.
|| Miscellaneous ||
- When you execute 'Reveal Layer Opacity' while having properties selected, all contained properties with an opacity will now be revealed too (e.g. clone stroke opacity properties when having the 'Paint' effect selected).
- When using 'Add / Remove Layer References' and the 1st selected layer has properties selected that contain a layer control (e.g. 'Set Matte' effect) & only 2 layers in total are selected, the function now sets the layer control to the 2nd layer (regardless of whether it's a a 'Precomp Clone', 'Matte Merge Layer', or 'Linked Adjustment Layer').
- Upon executing 'Preview Custom Clone Size', the 'Precomp Size' of the 'Precomp Clone' will now be automatically set to 'Custom Size'.
- In the 'Cloning Settings', ability to turn off automatic 'Refresh Connections' of 'Precomp Clones' that happen within various functions, e.g. when executing 'Parent Layers to Group', clones will be generally updated to the new parent. However, this can slow down the execution of these functions significantly when working with larger clones and thereby hinder your workflow. When turned off, you will have to execute 'Refresh Connections' yourself to update these clones.
- Functions have been updated to work when AE's new 'Mercury 3D' renderer is active.
- Workflower now has its own scripting API in beta. Please be aware that the API is experimental at the moment and has to be used with caution! Some functions might not work as expected. Read the user guide on the 'Scripting API' for more information.
|| System ||
- Updated to AEScripts licensing framework 4.1.4.
- Improved support and better error messaging for online activation.
- When checkboxes hold a tooltip with additional info, the icon [ ? ] will now indicate this.
- Workflower will now remember the last position of a borderless panel separately when executed from the ScriptUI Panel/KBar and when executed via a shortcut.
[CHANGED]
|| System ||
- IMPORTANT (Win only): Due to AE now occupying Shift+J & Shift+K, the default shortcut for 'Parent Layers to Group' has been changed to Ctrl+Alt+3 & for 'Set Parent Exception Layer' to Ctrl+Alt+Shift+3.
- (Win only in AE 22 and below): Due to 'Activate / Deactivate Tag Group 2' now occupying Alt+F5, the default shortcut for 'Unshy Layers' has been changed to Alt+9.
- Due to great usage, 'Delete Layer / Clone / Group' has been moved on the 'Main Menu' to the spot of 'Ungroup Layer/s' so that you don't have to a press modifier key to access it. Now press Shift to access 'Ungroup Layer/s' & Ctrl/Cmd to access 'Dissolve Group'.
- 'Relabel Layer/s' has been moved on the 'Main Menu' to the 'Groups' category since it's mainly used for group relabeling.
- 'Precompose' has been moved on the 'Main Menu' to the 'Layer' category.
- 'Delete Layer / Clone / Group' has been moved on the shortcuts panel from the 'Layers' to the 'Groups' functions section since it's mainly used for groups.
- 'Duplicate Group' has been renamed to 'Duplicate Layer / Clone / Group' to better reflect its functionality.
- System-related settings have been moved from the 'Miscellaneous' settings tab to the new 'System' tab.
- Logging is now enabled by default in order to make troubleshooting easier.
- Made online activation period more graceful.
|| Group & Layer Functions ||
- For improved visual clarity, sub-group headers will now NOT display the extra icon (Win: └ / Mac: >) left to the expanded/collapsed icon in 'Indented Layout'.
- Automatic trimming of regular track mattes to matted layers is now disabled by default due to resulting in confusing automatic trims in some instances. (Re-enable it by going to the 'Trimming Settings'.)
- The clone border expansion of 'Clones in Comp' will now be set to 0% by default.
- The experimental option to combine track mattes on one layer when merging mattes has been removed due to low usage.
[FIXED]
|| System ||
- Fixed a bug that would cause a 'JSON.parse' error.
- Fixed error in alert to open After Effects preferences to allow scripts to access network.
- Fixed a bug that caused Workflower not to find AE's shortcut file if you only had a major AE version installed whose version number had three digits.
|| Group & Layer Functions ||
- Fixed a bug when using Workflower's 'Precompose' that would shift a precomposed layer's position if it were parented to a layer outside of the selection.
- Fixed a bug when using Workflower's 'Precompose' that would not set the created precomp to the correct length if 'Leave all Attributes' was checked.
- Fixed a bug that would copy group-less layers in the wrong order to the clipboard after selecting all comp layers using 'Select Group' without any layer selected.
- Fixed a bug when using 'Delete Layer / Clone / Group' that would cause layers to shift position if they were parented to deleted layer.
- Fixed a bug that would throw an error while refreshing 'Group Mattes' when a 'Matte Merge' layer was the first layer within the comp.
- Fixed a bug within 'Store Layers' that prevented a group from being copied into a 'Store Comp' when only the group header was selected.
- Fixed issues that occurred when you executed Workflower on a comp with existing non-Workflower layer comments which could have caused Workflower to malfunction. Now, all existing layer comments will be deleted by Workflower beforehand.
- Fixed a bug that would cause AE to crash if illegal group header/footer constellations existed. Workflower will now exit the execution to prevent the crash and give instructions on how to fix the comp structure.
- Fixed a bug that would falsely remove the 'Group || Settings' effect when converting all comps to another layout and enabling 'Remove all Layer/Comp Comments'.
- Fixed a bug that would falsely add a 'Group Opacity' slider to a disabled track matte within a disabled group.

- Compatibility After Effects
BAO Boa
Add to CartBoa is a plugin for After Effects built to distort layers along mask paths.

- Compatibility After Effects
Layer Slayer
Add to CartPerfectly sync layers across the layer stack with a single click.
$40.00
- Compatibility After Effects
NumberLink
Add to CartCreate a number counting animation in 1 click! Links numbers to slider values and re-writes text instantly!


- Compatibility After Effects
Layer Chain
Parents each selected layer to the layer above it.Add to Cart$4.99
- Compatibility After Effects
Random Layer Selector
Randomly selects layers. There's 4 options for how many layers are selected randomly: You can randomly select most of the layers, many of the layers, not many and finally you can have it randomly select very few of the layers.Add to Cart$4.99