FX TextFlow
-
Compatibility After Effects Please check exact version compatibility under the "COMPATIBILITY" tab below
FX TextFlow is a really special tool : there is indeed NOTHING ELSE on the market that allows users to create multi-column text layers within After Effects (while this feature exists since decades in print & editing software like Indesign !)
So, if you ever need to create, compose and animate long text strings bounded in columns, to mimic Newspaper and Webdesign layouts, or even if you just want to experiment with new type treatments that were impossible to achieve in AfterEffects before... this product is for you :)
On top of that, FX TextFlow has 3 more really handy features to offer, that will be useful for ANY after effects user and motion designer :
- You can create both bounded paragraph text box and regular inline text layers, either empty or filled with predefined (and customizable) substitution text, with the click of a button, thanks to a few simple shortcuts. Never right-click in your timeline again in order to create a perfectly centered text layer... just click the button !
- Each new text layer generated by FX TextFlow will benefit from a really convenient FX reposAnchorPoint effect, that will drive the layer's anchorPoint so that it stays exactly where you want it to be (top left, middle, bottom right...), no matter which kind of text you have. It's fully automated thanks to expressions and the effect's option can be animated and even be used in .mogrt templates to align your text in Premiere !
- Add some sample text to your selected text layers procedurally thanks to the Sample Text Generator ; it allows you to instanciate one string of text that you can edit (by default it will either be some "Lorem Ipsum..." if your selected layer is a bounded text box or the famous "The Quick Brown Fox..." sentence if your selected layer is an inline "regular" text layer) ; you can chose how many instances of this string you want your text layer to be populated with, add predefined separators (space, return, dots, dash...) between each instance, and even add the instance IDs as prefixes and/or suffixes ! Perfect for quickly adding menu items, file names, chapters titles...
Here is how the UI is looking :
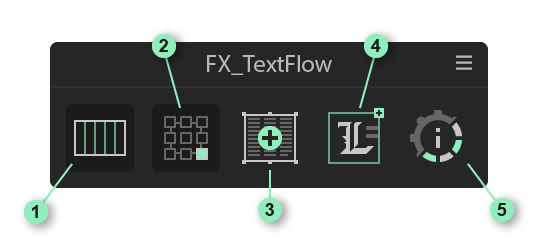
And here are the detailed explanations of each button (refer to their number in the image above) :
1. Change Columns count :
Use this dropdown list to set the number of columns (1 to 5) for the bounded text layer created by FX Textbox.
This setting will then be taken into account when you will click on the third button 'Create new Text Layer'.
You can also update one or more selected bounded text layer(s) created by FX Textbox, just by changing the selection in this dropdownlist ; it will then set the 'Number of colums' in the 'FX_textColumns' effect on the fly !
2. Change Anchor Point position :
Use this dropdown list to set the anchor point's position on any text layer created by FX Textbox. This setting will then be taken into account when you will click on the third button 'Create new Text Layer'. You can also update one or more selected text layer(s) created by FX Textbox (bounded in a box or regular inline text), just by changing the selection in this dropdownlist ; it will then set the 'Horizontal Alignment' and the 'Vertical Alignment' in the 'FX_reposAnchorPoint' effect on the fly !
In any text layer created by FX TextFlow, you'll find a convenient 'FX_reposAnchorPoint' effect, where you'll be able to change the alignment for both dimensions ('Left', 'Center', 'Right' for Horizontal Alignment / 'Top', 'Middle', 'Bottom' for Vertical Alignment).
This is where you will also find 2 other useful options : 'Rect At Time (sec)' is set on 3 by default because you'll usually want to animate your text In with some text animators - with TextEvo2 from my buddy Matthieu Wlazinski for example - so you'll probably have to set this value to be AFTER the end of your inAnimation if you do not want your anchor point to jiggle during the text animation.
The 'Auto Animate over Time' forces the 'Rect At Time (sec)' value to be animated over time with an expression ; this is why its value shows in red ! But don't worry, you can still edit it ;)
3. Create new Text Layer :
This button works in combination with shortcuts (as described below) ; in whichever case, you'll end up with a new created Text Layer in your active composition after having clicked this tool, and it will receive an expression on its anchorpoint, linked to an 'FX_reposAnchorPoint' effect, that will make it reactive to the second 'Change Anchor Point position' dropdown list (see above).
- CLICK : Create an empty bounded Text Layer (aka the 'paragraph box you obtain when you draw a rectangular selection with the AE's text tool')
- CLICK + ALT : Create an empty inline Text Layer (the 'regular' text you obtain when you just click in your composition with the AE's text tool')
- CLICK + SHIFT : Create a bounded Text Layer (see above in the 'CLICK' explanation), but filled with some 'LoremIpsum...' sample text. The script will then calculate the average number of words depending of the Composition's size and Bounded Text Ratio (see 'Change Settings' for more info), in order to fill the bounded box as much as possible. Depending of your composition, this step can be pretty long to compute so, if things are a bit laggy after having clicked this button with SHIFT hold down, this is normal... just be patient :)
- CLICK + ALT + SHIFT : Create an inline Text Layer (see above in the '+ ALT' explanation) filled with one single sentence based on the famous 'QuickBrownFox...' substitution text, because it makes more sense for a single line rather than a long paragraph.
You can change after while the "Gutter width" (50 pixels by default) in the same named option of the 'FX_textColumns' effect of your text layer, and increase or decrease the 'Max Lines per Column' number in order to fit your needs. Sometimes - especially when you will replace the substitution "LoremIpsum..." text by your own shorter or longer text, you will have to double click on your text layer in order to edit its text box transform size. Please do it each time that you fill your text is cropped or if you have the impression that the columns count you obtain 'visually' isn't respecting the one you had chosen (it can be tricky sometimes, but not that complicated once your have understood :)
4. Add/Remove LoremIpsum/QuikBrownFox/generatedSampleText :
This button works in combination with shortcuts too ; it will add or remove some text from a selected Text Layer, depending of both the type of text layer it is (bounded or inline) and the shortcut you use ;
- CLICK : Add one Sample Text instance to the selected text layer
- CLICK + ALT : Remove one Sample Text instance to the selected text layer
- CLICK + SHIFT : Add procedural text through the SampleText Generator
Just edit the sample's text in the big editable text field (depending of the text layer type you have selected, it will be already written with either a 'LoremIpsum...' paragraph - in case of a bounded text - or a 'QuickBrownFox...' sentence - in case of an inline text).
Then type how many copies of your sample you want to populate your text layer with the 'Samples x' field (Entering '5' instead of the default '3' number will duplicate the sample 5 times for example).
Choose which glyph will separate the copies with each other by selecting its name in the 'separator' dropdown list (for example 'underscore' or 'spaced pipe' ; choosing 'none' will join the copies without any separator at all).
The cool thing is that you can add the index of each copy to the beginning (with the 'prefix' dropdown list) or at the end (with the 'suffix' dropdown list), which is perfect if you want to create a large number of menu items or chapters numbers that will increment automatically !
Once you have set up all the options, just click on 'Apply generated text to selected text layer(s)' in order to fill your text layer(s) with your procedural text and 'voilà' !
Please note that both the bounded and inline sample texts written by default when you open this generator can be set to be different from the 'LoremIpsum...' and 'QuickBrownFox...' classical texts if you want ! To change them, just ALT+CLICK on the last 5th 'Help & Info / Change prefs' button, and edit them here before saving the settings.
5. Help & Info / Change Settings :
If you hold down the ALT key while clicking the last 5th button, you will open a new window, where you will be able to change various default settings of FX textFlow :
• 'Bounded Text Color' : enter a valid hexadecimal code here if you want to change the default grey color of newly created FX textFlow bounded text layers with the third creation button
• 'Bounded Text Box Comp Ratio' : by default, each time you'll create a new FX textFlow bounded text layer with the third creation button, it will adapt its box size depending of the active composition size, proportionnaly to this ratio. So, for example, if you are in a 1080x1080 comp and if you do not change the default value of this ratio (which is set on '3/4'), your multi-column FX TextFlow bounded text box will be created to 'visually' a 810x810 square size. But if you change this to be on '1/2', after having saved the settings and reload the script panel, next time you'll create such a multi-column FX TextFlow bounded text box, it will be with 540x540 dimensions. While chosing a '1' ratio would of course fill the whole comp with your text.
• 'Default Columns count' and 'Default AnchorPoint' : set other selections in this two dropdown lists if you are not satisfied with the default '3 columns count' for the first button, and the default 'Middle Center Anchor Point' for the second option of the UI.
• The last two big edit text fields allow you to change the default 'Lorem Ipsum...' and the 'QuickBrownFox...' sample text already written in the sample's text edit field of the SampleText Generator.
You can then 'Save settings' in order to register them locally on your machine, in your roaming app data, but only if you have the option 'Allow Scripts to write File and Access Network' checked ON in your Preferences in the 'Scripting & Expressions' tab. You will then have to close and reload the script's panel in order to update the tool's settings.
Typing 'Enter' on your keyboard will do the same than clicking on this 'Save settings' button.
If you have messed up some settings and would like to retrieve them as they were by default, just click on the second 'Reset Settings' button.
Clicking the 'Cancel' button will abort the settings change and close the window (you can also use the escape key on your keyboard to do so).
_______________
INSTALLATION :
Use the aescript and plugins manager or copy and paste both the FX_textFlow.jsxbin file AND the FX_textFlowAssets folder into your Adobe After Effects' Scripts > ScriptsUI Panels folder.
COMPATIBILITY :
FX textFlow needs the 'Text.style' expression features that were introduced in the 17.0 version (After Effects 2020) to work properly, so... This script panel won't be loaded at all and an error message will pop-up if you try to launch it with AfterEffects older version !
IMPORTANT :
In order to avoid any expression error, please use the JavaScript expression engine only (not the Legacy Extendscript one)!
FX TextFlow for After Effects Overview
| After Effects | 2024, 2023, 2022, 2021, 2020 |
|---|

 Adding to cart...