Composite Brush
-
Compatibility After Effects Please check exact version compatibility under the "COMPATIBILITY" tab below
 Adding to cart...
Composite Brush is an accurate and easy to use color selector and modifier for After Effects. Create a selection with just a few strokes, and modify colors or pull a key with the effect. See more demo and tutorial videos below
Reactions


— Ronaldo Serrano (@rserranoart) October 31, 2018


Controls
 Click and drag: Assign selected colors. (Also called positive selections).
Alt+click and drag: Assign un-selected colors (negative selections.)
Transfer Mode Color: This color will be used with the transfer mode, if it is a transfer mode which modifies colors.
Transfer Mode: The compositing operation applied to the selected colors.
HSV Color: Copies Hue of Transfer Mode color, multiplies 2x the saturation and lightness of the transfer mode color. It’s 2x because anything over .5 will make the color brighter, anything less will make it darker.
Hue: Copies the hue of the transfer mode color to the selection.
Saturation: Copies the saturation of the transfer mode color to the selection.
Luminance: Copies the luminance of the transfer mode color to the selection. Multiplies the transfer mode color x2 by the selection. .5 has no effect, higher makes the selection brighter, lower makes it darker.
Normal: copies the transfer mode color over the selection. Increase Alpha: boosts the alpha channel at the selection. Color is unchanged
Stencil Alpha: Removes alpha at the selection.
Silhouette Alpha: Removes alpha outside of the selection.
Restore Original RGB: Brings back the original image's RGB channels inside your selection.
Restore Original RGBA: Restores entire image, RGBA, from the entire image inside your selection.
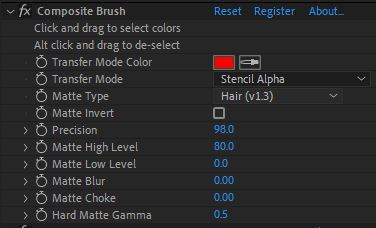
Matte Type: The method of interpreting a selection based on selected and unselected colors.
Hard: Processes quickly, grabs large regions of color. This is the best mode to use whenever possible because it’s fast and limits the colors it grabs.
Medium: A much softer falloff than 'hard' transfer mode. Good for general purpose matting of opaque objects. Probably better than 'hard', but a slower.
Soft: This mode is likely going to be deprecated in the future, it's made obsolete by the hair mode, and shares too many similarities to 'Medium' to be useful.
Hair v1.3: This mode only selects one Positive selection, but accepts multiple negative selections. (Click to assign a positive selection, alt-click to assign a negative selection.) This mode was specifically built to get a very soft falloff when keying hair, glass, smoke, fire, etc... If you have multiple positive selections, reset the Plug-in to clear them. We'd recommend focusing on just keying the semi-transparent values in your image using this mode. Add as few negative selections (alt-clicks) as possible to reduce the hardness of the key, and make things process faster.
Matte Invert: Inverts your matte.
Precision: Sometimes you may choose selected (positive) and unselected (negative) colors that are very similar to each other. A high precision value (max 100) will allow the key to be as precise as possible, allowing two very similar colors to have different designations. A low precision value will automatically delete a selected color if you alt-click nearby, or delete an unselected color if you click nearby. This number is a percentage, if your matte becomes difficult to modify, or too sharp, it may help to turn the precision down and do some more clicking and dragging.
Matte High Level: This clips the alpha values at the top. It works the same way “Levels” does, with an alpha channel. It’s recommended that when using a Soft Matte, you turn this to roughly 95 or 90. Lowering it can help you get good results quicker without making too many selections.
Matte Low Level: This clips the lowest alpha values.
Matte Blur: How blurred the selection matte is. Note: Right now this number only accepts integers. As a workaround, you can always just use an alpha modifying transfer modes, and resort to the built-in blur and choke controls for more precision.
Matte Choke: This expands and contracts the boundaries of the Matte, it's very similar to the After Effects "Simple Matte Choker".
Hard Matte Gamma: Only processes when the Matte Type is set to hard, this is the gamma of the selection matte.
Important to note:
We support the latest version of After Effects from the Creative Cloud.
We have thoroughly tested the plugin in After Effects 2018, and a bit in 2019. Please download and test the trial on your machine before buying. This plugin was officially released October 26, 2018. While we aren't aware of any major bugs, please understand that the version 1 may have some unexpected bugs, and bear with as we fix them as quickly as possible. Please submit a help ticket if you find any bugs, it would be greatly appreciated.
The plugin is unique from other color correction or keying plugins in that it always sources the pixels of the layer it's on while ignoring any effects that come beneath it. This creates a huge advantage by always keying from the original colors of the shot, allowing you to stack color and keying effects before it, and still keeping the same key. That being said, any effects that change the size or shape of the layer, will cause issues. Because Composite Brush ignores the effects before it, if you were to blur or Distort the layer before Composite Brush, the color change from Composite Brush would still appear sharply on the original image. The solution is to put any distortions or blurs after Composite Brush in the effects chain or to just pre-compose all effects and use Composite Brush on the Pre-comp.
This plugin is mostly color based. For example, if there's a color RGB 'Green' (47, 240, 38) in the foreground, and the same exact color RGB 'Green' (47, 240, 38) is in the background, both pixels are very likely to receive the same exact selection value. Color carries the heaviest weight when determining the alpha value, the other qualities of the image, a lot less.
FAQ:
When I click my layer, nothing get's selected, or the layer is moved.
Make sure you have Composite Brush Selected, and nothing else.
Make sure your UI is turned on. To toggle your UI visibility:
Mac: Command+Shift+H
Windows: Ctrl+Shift+H
Alternatively, just draw a mask on your layer, which toggles on the UI, then delete the mask.
Do you support 32 bit colors?
Sort of. We do process our color changes in 32 bit, however, our selections are strictly limited to the normalized 0-1 range. Super bright, and negative colors are simply considered as white (RGB 1,1,1) or black (RGB 0,0,0).
TIPS:
The fastest way to get a good selection is to click and drag liberally all over your frame.
The best way to get a good selection is to use as few clicks as possible, simply because the plugin will process faster with fewer strokes to calculate.
How do I create a log file?
On Mac, go to
Macintosh HD/Users/[your account]/CompositeBrush
On Windows, go to
C:\Users\chris\CompositeBrush
If the folder doesn't exist, please create it.
Start Ae, apply Composite Brush, and use it until whatever error or bug appears. A new txt file will be created in the directory above. Send us that txt file through a help ticket, with a description of how to reproduce the error.
| After Effects | 2024, 2023, 2022, 2021, 2020, CC 2019 |
|---|
1.6.8 (Current version) - Dec 19, 2023
1.6.7 - Nov 7, 2022
1.6.6 - Aug 21, 2022
1.6.5 - May 1, 2022
1.6.4 - Feb 5, 2022
1.6.2 - Nov 26, 2020
1.6.1 - Sep 27, 2020
1.6.0 - Jul 21, 2020
1.5.2 - Apr 30, 2020
Fixed a possible compatibility error with previous projects.
Added better adaptation to different linear colorspaces.
1.5.1 - Mar 29, 2020
1.5.0 - Mar 19, 2020
- Added optimize & soften button. This button makes Composite Brush run slightly faster by eliminating redundant processing, and also applies the key softness parameter. The goal will be to have this happen automatically without a button press in future versions.
1.4.3 - Dec 11, 2019
1.4.2 - Aug 29, 2019
1.4.1 - Aug 23, 2019
1.4.1 - Aug 22, 2019
1.3.0 - Jan 13, 2019
- Hair (v1.3) selection style.
- Matte Invert checkbox.
- Restore RGB transfer mode.
- Restore RGBA transfer mode.
[Improvements]
- Expanding the range of Matte Choker to be [-1000 .. 1000].
1.2.0 - Nov 27, 2018
Added "Replace Alpha" Transfer mode.
Removed "Alpha Minimax" and replaced with "Matte Choke".
1.1.0 - Nov 12, 2018
Set Precision to 100 by default.
Added decimal level blur control.
1.0.0 - Oct 26, 2018
-

- Compatibility After Effects
Fixel DeLightIT 2
Add to CartFixel DeLightIT is a color correction plugin optimized for correcting the colors in the highlights regions. The result is an image with optimized colors and revealed details in the bright regions. DeLightIT is fast effective and simple to use.
Owners of previous versions of Fixel DeLightIT are entitled to 50% discount..
-

- Compatibility After Effects
- Compatibility Premiere
ft-Color and Channel Bundle
Add to CartA suite of tools to manipulate colors and channels for several tasks: ft-Brightness Check, ft-Clamp, ft-Color Gray and ft-CombineRGA
-

- Compatibility After Effects
AE Shapes Blender
Add to CartNow blend shapes easily in After Effects with many great features. Control the spine path the way you want them to blend and offset the paths easily. Create and animate beautiful loops.
-
- Compatibility After Effects
PATTOON 2 Texture & Displace
Add to CartPATTOON 2 Cyber SALE in November 2023 SAVE BIG Check out the new features. We put in some work so you can create even more stunning visuals more easily. See for yourself what the new and improved features can do.
- Glitch
- Displace Engine (improved)
- Flicker (improved)
- Turbulence (reworked)
- Displace Pixelshape(new)
- Displace Emission (new)
- Dissolve (new)
- Distortion (new)
Mix & match to create even more versatile effects. We can't wait to see what you can do with it.
Texture mapping in Adobe After Effects is finally made easy with PATTOON. Get direct layer access to your textures from Creative Cloud Libraries, Photoshop and more plus a bunch of extra features, textures and presets for all your designing needs.
50% upgrade discount price available. More information below
-
- Compatibility After Effects
Depth Scanner
Add to CartNow includes Depth Anything v2. Artificial Intelligence-based plugin for automatic depth estimation. Available for macOS (>11.5) and Windows!
-
- Compatibility After Effects
Zorro-The Layer Tagger
Zorro lets you group layers in after effects by adding tags to layers. Similar to the way you would tag photos in Flickr, you can tag layers in your comps and then select or isolate those layers in groups by using the tags.Add to Cart
-
- Compatibility After Effects
- Compatibility Cinema 4d
- Compatibility Blender
Lockdown 3 for After Effects
Add to CartNew FREE version of Lockdown which allows 1 and 2 point tracking. Lockdown is the original and best plug-in that allows you to track warping surfaces inside After Effects. Lockdown 3 lets you give your mesh 3D depth. Easily send the mesh to Cinema 4D, Blender, and other 3D apps to attach objects, digitally re-light, and more!
Click the TRY button above to download the free version.
$399.99