Sheetah - Spritesheet Tools
-
Compatibility After Effects Please check exact version compatibility under the "COMPATIBILITY" tab below
Sheetah turns your composition into a single spritesheet file blazingly fast. It is targeted for everyone working with spritesheet animations, like 2D/3D Game Artists. It also features tools to generate custom animation sequences.
Features
- One button goodness
- Exports to: png, tga, tif
- Alpha channel included
- Optimal spritesheet dimensions
- Dockable UI panel
- Remembers user settings
- Animation Tools for custom animation sequences
- Animation Sequence export as .txt file
- (optional) a Photoshop script to turn image sequences and movies into spritesheets
Installation
How to install Sheetah on your system.
Adobe After Effects CS 5.5 or higher required. Please note that this package requires After Effects CS 5.5 or higher. It has been tested with CS 6 and CC.
Step 1: Buy/Download
We put a lot of effort in creating sheetah. Still we decided to distribute it under the "Name your own price" policy. This way you can decide how much you want to pay for it or even get it for free.
Step 2: Unzip and move folder
Unzip the sheetah.zip package. Put everything inside the downloaded After Effects/ScriptUI Panels folder in your After Effects Installation directory: [path]/Adobe After Effects [version]/Support Files/Scripts/ScriptUI Panels
ATTENTION: Please do not use After Effects install script function as it will only move the .jsx file and not the needed resources folder! You have to copy & paste the files manually!
Step 3: Activate in After Effects
Start Adobe After Effects, go to Window, and Select "Sheetah.jsx" to open Sheetah's UI panel
Step 4: Dock the UI Panel
Sheetah features a persistent, dockable UI Panel. This way you can incorporate it with the existing UI and do not have to start the script manually.
Step 5: Enjoy!
Enjoy using sheetah! If you encounter any bugs or have ideas for improvement please drop us a line at [email protected]
(Optional) Step 6: Install the Photoshop script
Sheetah comes with an optional Photoshop script to turn image sequences and movies into spritesheets. Merge sheetah's Phtotoshop/Scripts folder with your following Photoshop Installation folder: [path]/Adobe Photoshop [version_number]/Presets/Scripts
User Interface
Usage
Spritesheet Tools
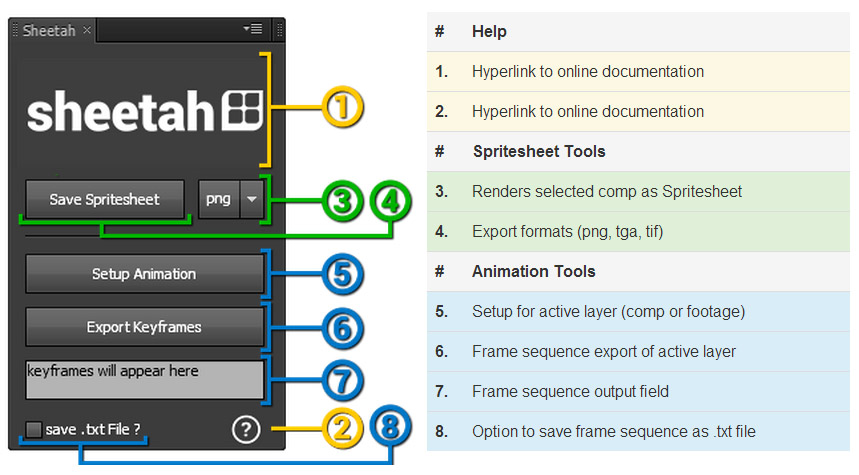
The Spritesheet Tools are the main feature of this extension. The goal was to simplify creating spritesheets as much as possible. You can export a spritesheet in 2 easy steps.
Step 1: Choose your export format
Select the preferred export format for your spritesheet. At the moment the available formats are png, tga and tif. The script will automatically export the alpha channel to make your life easier. Sheetah will remember the selected format so you do not need to setup this option again.
Step 2: Render Composition as Spritesheet
After creating your animation select your composition and click the scripts "Save Spritesheet" button. The script will attempt to create a single image containing all frames of the composition. A dialog will prompt you to type in a filename. Sheetah will try to auto generate a suitable name using this schema:
{comp_name}_#[{width},{height}].{extension}
Info:
Sheetah automatically calculates the best possible pattern for the amount of rows and columns of the spritesheet. This means you do not need to set these values manually, yay!
Animation Tools
The Animation Tools have been developed to generate custom animation sequences based on your spritesheet. These are used especially in 2D or 3D games. Instead of simple forward or backwards playback you decide in which order frames ar played back. This is often done using comma separated frame sequences eg.: 1,2,2,2,3,3,4,5... In a nutshell these sequences give artists the flexibility to recycle their spritesheet to generate more complex animations.
Step 1: Setup a composition for animation
Start by selecting the composition containing your animation. Now wrap this composition in a new empty composition to start creating your custom sequence. Select the composition layer and click "Setup Animation". The script will add a Slider Control Effect among some other things. After its finished you can start creating your custom animation sequence by animating the Slider value. The Slider value represents the actual frame number of your composition.
Step 2: Export custom animation sequence
After you are satisfied with your custom animation sequence use the "Export Keyframes" button to export your frame sequence as comma seperated frame numbers. The result will be shown in the text field under the button. It will be repopulated everytime you click "Export Keyframes". To select all keyframes click into the textfield and hit strg+a on Windows or ⌘+a on Mac. The animation sequence can be exported as a .txt file as well. Simply click the corresponding checkbox. Everytime you click "Export Keyframes" the script will prompt you for a filename and export a .txt file containing your custom sequence.
Links
| After Effects | 2022, 2021, 2020, CC 2019, CC 2018, CC 2017, CC 2015.3, CC 2015, CC 2014, CC, CS6, CS5.5, CS5 |
|---|
2.4.3 (Current version) - Aug 29, 2022
2.4.2 - Aug 11, 2015
2.4 - Jun 26, 2015
2.3 - Jan 13, 2015
2.2 - Sep 5, 2014
- added export option for power of 2 textures
- added option for manual distribution patterns (columns and rows)
- changed spritesheet file name syntax to present more valuable information
- improved custom animation pipeline (including better .json export)
- added support for multiple animations in one composition
1.3 - Mar 3, 2014
- added notifications if max. comp size is exceeded
- added JSON lib for upcoming big changes
- - Initial release - March 2014

 Adding to cart...