Vertex Tool
-
Compatibility After Effects Please check exact version compatibility under the "COMPATIBILITY" tab below
ROUND THAT CORNER WITH THE CLICK OF A BUTTON!
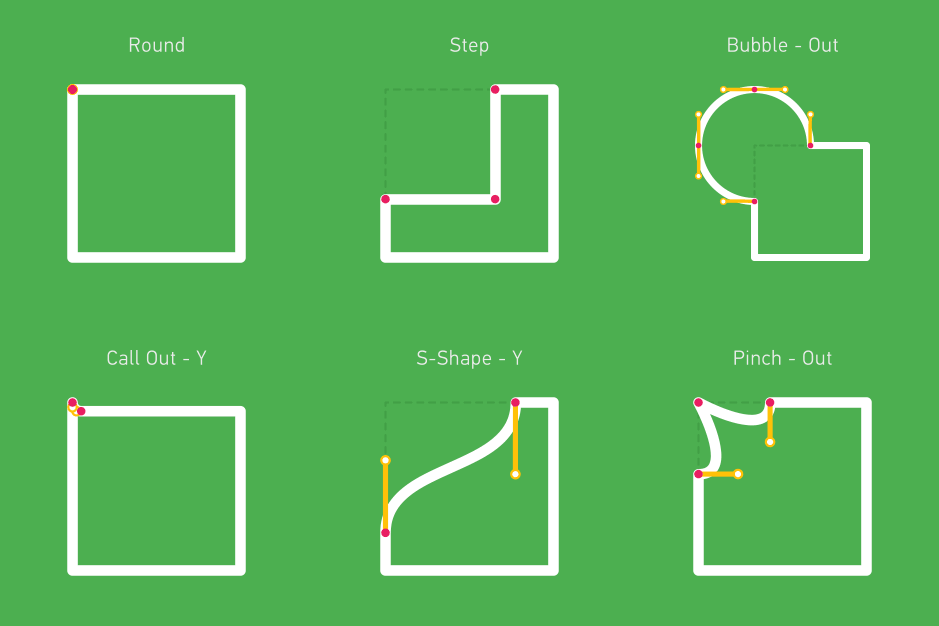
Vertex Tool applies rounding algorithms to a shape by placing two (in some cases more) new vertices in place of original one at selected corner, based on a specified line length. There are 12 corner rounding algorithms to choose from.
To avoid shape distortion when animating from initial shape to a new one, use Animate feature and set the transition duration in frames. This is important when using rounding method that adds 3 or more vertices (step, bubble, pinch).
Store Shape Data option reads shape data (coordinates of vertices, in/out tangents) and stores it in shapes expression field. This way you are able to restore original shape at any time with Restore Shape button.
Vertex tool tutorial in the Arabic language is provided by motion graphics designer and
Adobe Certified Instructor @fatoomdes
Features
- 12 rounding algorithms,
- Target one specific vertex, or all vertices of multiple selected shapes at once,
- Set the rounding value by pixels or percent,
- Option to animate from the initial state to modified,
- Remove rounding of the corners with the Find intersection point option,
- Live coordinates of the vertex in focus (including in/out tangents),
- Set custom tangents for all or selected vertex,
- Store/restore shape data,
How it works
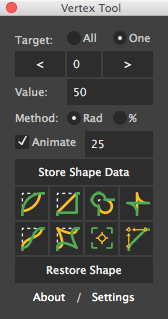
Select a Path or Mask property (or multiple layers that contain them) and launch the script. Select Target: All when applying rounding method to all vertices of your shape or use Target: One to act on one specified vertex. If second method is used, a target object will appear in the composition, that represents vertex in focus. Use buttons < and > to navigate to your vertex of choice (Shift + click and Cmd + click skips predefined number of vertices) or enter vertex number manually.
Enter rounding value and choose Radius or Percentage method. If rounding value is greater than the distance between selected and two neighboring vertices, then the minimum distance between neighboring vertices will be used as rounding value.
If you are going to transition from original shape to rounded one, then enable Animate option and set morphing duration in frames. This will ensure that transition goes as smooth as possible. Failing to enable this checkbox will result in weird, wonky and undesired transformation.
Do not forget to make a copy of your shape when dealing with complex shapes. Store Shape Data options does similar thing - it reads shape data (position of all vertices and in/out tangents) and stores it in expression field. Later, if you need to restore original shape, you can do so with "Restore Shape" button. Original shape and keyframe will be created at time, at witch it was recorded.
Click on an icon of your choice to apply default method (green stroke). Use CMD (Mac) or Ctrl (Win) to apply alternative shape (yellow stroke).
Set Custom Vertex Coordinates will open up a dialog where you can specify coordinates for selected vertex. You can also define in/out tangents and choose either Layer Space or Screen Space coordinates system.
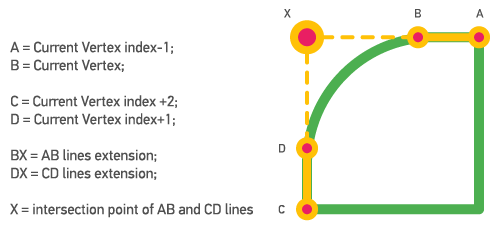
Find Intersection Point calculates intersection of two lines:
- First line: "Current Vertex - 1" to "Current Vertex";
- Second line: "Current Vertex + 2" to "Current Vertex + 1".
If these two lines intersect at any point in space, then two vertices ("Current Vertex" and "Current Vertex + 1") will be repositioned there. This option is useful when you need to transition from rounded to a sharp corner.
Notes
- Vertex Tool works with Bezier shapes, so all the parametric shapes such as rectangle, ellipse, and star, must be converted to a Bezier shape. To do so twirl open the shape layer and right-click the shape path for example, Rectangle 1, and select Convert To Bezier Path.
Trial version
The free trial version which can be downloaded above is limited to maximum 5 vertices per path
| After Effects | 2024, 2023, 2022, 2021, 2020, CC 2019, CC 2018, CC 2017, CC 2015.3, CC 2015, CC 2014, CC, CS6, CS5.5, CS5, CS4 |
|---|
1.1.2 (Current version) - Aug 15, 2022
- Using @2x icons in the UI.
Fixed:
- Broken floating panel UI.
1.1.1 - Jul 14, 2020
- Licensing framework.
Fixed:
- Could not target Mask property on a non-Shape Layer if `tartget All` mode was enabled.
1.1 - Nov 13, 2019
- `Vertex Coordinates` window can modify the position of vertices and in/out tangents for all shape points,
- `Vertex Coordinates` window auto-updates when `<` or `>` buttons are clicked,
Changed:
- Drastically improved codebase,
- `Target: All` now works with multiple selected shapes,
- `Vertex Coordinates` window and `Find intersection point` works with `Target: All`,
- Modifier key for alternate shape changed from `cmd` into `alt`,
- Licensing framework.
Fixed:
- `Find intersection point` ignoring the direction of the lines.
 Adding to cart...