Tweaks
-
Compatibility After Effects Please check exact version compatibility under the "COMPATIBILITY" tab below
 Adding to cart...
 Tweaks for After Effects: Shape your path.
"Tweaks" is a comprehensive toolkit for manipulating intricate paths, shapes, and layers.
From morphing multiple shapes simultaneously to intricate path manipulations or particles creation, this tool handles the heavy computational work, freeing you to focus on creative nuances like duration, property adjustments, and keyframe customization.
It opens new avenues for creative exploration in After Effects
Some features (not all) are now compatible with PRIMITIVE SHAPES; Otherwise, select the path of the primitive and turn it into the Roto-Beizier Path.
v1.0.6: Deleted: "Opacity Wizard", replaced by (more obvious) "Opacity Reducer" & "Opacity Amplifier".
New features:"Desaturator" & "Blur Wizard".
User Interface:

The UI is divided into two rows of 2 tabs:
- Points/Paths, Shapes/Layers
- Polymorph and Spreaders
Each tab has its list of features. At the bottom, you'll find a checkbox to tick if you want to delete Tweaks Guidelayers while removing expressions, then the erase tool, our bake path-expressions tool, the explode shapes feature, and the GRID (distribute in RECT-CIRC-TRIANGLE), the button to Turn your Primitives in a Bezier Path before applying a Tweak (or not), and the Submit (Launch) Button.

Because we can't remember more than seven pieces of information, making you remember +30 features would be wrong!
"Tweaks" is fully documented; tick the "Tool Tips" box, and all the information appears!
Handy Particles:
Handy Particles allows you to create captivating particle effects in your projects effortlessly, even custom shapes. From simulating rain or a burst of stars to adding a sense of speed or dynamic motion, Handy Particles easily makes it all possible.


Tab Polymorphers: 4 tools and many possibilities.
The PolyMorphers offer a powerful yet user-friendly way to morph shapes in Adobe After Effects with customization tools.
Polymorphers have global Proximity and Sensitivity Controls and many Easing functions before you launch them.
You can try to copy multiple paths in a row from Illustrator: you'll have a bunch of masks, which is not handy.
There are so many ways to morph a set of shapes from one layer to another that you might spend all your life playing with it.
All parameters, and above all, the "Easing" Selection, is crucial.
Some Text can be morphed from Thin to Bold, but it depends on many factors (Uppercase is more convenient so far)
PolyMorpher: "Classic"

Polymorpher Cassic was made to create smooth transitions: Select two layers you wish to morph. The 1rst one will be the morphed one, and the second will be the Reference. After submission, the tool will automatically generate a guide layer with unique naming conventions, "Morph-[Number]" and "Ref-[Number]".
The guide layer "XMorph-[Number]" contains the markers to control the morphing duration.
- Markers: These are present in the guide layer and allow you to control the start and end times of the morphing animation.
- Threshold: Intensity of the morphing effect.
- Tolerance: Similarity while morphing.
PolyMorpher: Intricate

"PolyMorpher: Intricate" facilitates shapes morphing between two selected layers with a numerous-shape approach.
Select two layers you wish to morph. The 1rst one will be the morphed one, and the second will be the Reference. After selection, the tool will generate a guide layer with unique naming conventions, such as "Morph-[Number]" and "Ref-[Number]".The guide layer "XMorph-[Number]" contains the markers to control the morphing duration.
- Markers: These are present in the guide layer and allow you to control the start and end times of the morphing animation.
- Threshold: Adjusts the complexity of the morphing paths.
- Tolerance: Adjusts the complexity while morphing.
PolyMorpher: Legacy

"PolyMorpher: Legacy" facilitates shapes morphing between two selected layers with a geometrical approach.
Select two layers you wish to morph. The 1rst one will be the morphed one, and the second will be the Reference
After selection, a guide layer named "XMorph-[RandomName]" will be automatically created.
This guide layer will have markers and controls essential for the morphing process.
- Markers: These are present in the guide layer and allow you to control the start and end times of the morphing animation.
PolyMorpher: Explosion

The "PolyMorpher: Explosion" is a feature designed to morph between two selected layers in a visually stunning explosion-like transition.
Select the two layers you wish to morph. After selection, a guide layer named "XMorph-[RandomName]" will be automatically created. This guide layer will have markers and controls essential for the morphing process.
- Markers: These are present in the guide layer and allow you to control the start and end times of the morphing animation.
- Threshold: This control adjusts the intensity of the boom effect.
Tab Points-Paths:
Give you granular control over your paths. Features like "Complexifier" allow you to add complexity to your paths by dynamically adding points and adjusting their positions. "Tornado" lets you transform a single shape or stroke into a customizable, rotating pattern, offering controls for its frequency, height, width, and orientation whether you're looking to create subtle, natural movements with "Breeze" or more abstract forms with "Complexifier," the "Points & Paths" features provide a comprehensive toolkit for all your path manipulation needs.
Swallower

This feature helps create complex animations involving shape deformations, such as swallowing or rejecting effects. To activate the "Swallower" feature, you need to select the shape layers you wish to deform. A guide layer, "Swallower", will be automatically generated, offering sliders for the following controls:
- Swallow & Reject: Sets the force with which the shape is attracted or repelled from the guide layer.
- Min Distance: Sets the minimum distance for complexity addition.
- Upscale: Scales the shape.
- Complexity: Adds complexity to the segment's deformation.
Breeze / Zephyr

Select the layers containing the paths you want to manipulate. A guide layer named "Breeze" will be automatically created. This guide layer will have sliders for "Freq", "Speed", "Damping", "Smoother", and "Amplitude Solver". Breeze has an attached point (the first vertex; right-click on the shape to choose it). Zephyr does not have an attached point and "vibrates" freely.
- Freq: Controls the frequency of the breeze effect.
- Speed: Controls the speed of the breeze animation.
- Damping: Controls the damping effect, which reduces the amplitude of oscillations over distance.
- Smoother: Controls the smoothness of the shape.
- Amplitude Solver: Controls the amplitude
WaveCraft

Select the layers containing the paths you want to manipulate. A line with 2 points is enough. A guide layer with a random name like "WaveCraft-XYZ" will be automatically created. This guide layer will have sliders for "Frequency", "Amplitude", "Phase", and "Speed". The more you have points on the path, the more accurate the waves are.
- Frequency: Controls the frequency of the sine wave.
- Amplitude: Controls the amplitude of the sine wave.
- Phase: Controls the phase of the sine wave.
- Speed: Controls the speed of the sine wave animation.
Simplifier

Select the layers containing the paths you wish to make less complex (reducing the number of points in paths). The tool will create a guide layer named "Simplifier". Move the Guide horizontally to do the magic.
- Each shape has its path simplified based on the guide layer" 's horizontal position (x-axis) + its slider Intensity
Complexifier

Select the layers containing the paths you wish to make more complex. It might "recreate the selected shape within the new shape in many cases." like all features, do not hesitate to use negative values. The tool will generate a guide layer named "Complexifier" with the following controls:
- Divider: Guide Position multiplier
- Horizontal Solver: Allows you to control the horizontal projection of the paths
- Vertical Solver: Enables you to manage the vertical projection of the paths
- Guide Position: The " guide layer " 's composition position determines the threshold for adding complexity. The Y-coordinate of the guide layer" 's position is used as the threshold. Points above this threshold will have additional points inserted between them.
Catch Points Curved

It allows you to manipulate path points and their tangents with a guide layer. This feature uses a guide layer named "Catch Points Curved" to control the path points" positions and tangents. Select the layers containing the paths you want to manipulate. A guide layer named "Catch Points Curved" will be automatically created. The path points and their tangents will be attracted towards the guide layer" 's center.
- Attraction Strength: The radius of the guide layer influences the strength of the attraction.
Repulse Points/Repulse Points Bezier

Select the layers containing the paths you want to manipulate. A guide layer named "Repulse Points" will be automatically created. The path points will be repelled away from the guide layer"s center.
- Repulsion Strength: The radius of the guide layer influences the strength of the repulsion.
Flames

Select the layers containing the paths you want to manipulate. A guide layer with a random name like "Flames-XYZ" will be automatically created. This guide layer will have sliders for "Threshold", "Speed", "Seeds", "Attraction Intensity", and "Noise" and will create a fire. Use the threshold value for a consistent effect.
- Threshold: Controls the Y-axis threshold for the flame effect.
- Speed: Controls the speed of the flame animation.
- Seed: Controls the randomness of the flame effect.
- Attraction Intensity: Controls the intensity of the flame" 's attraction towards the guide layer.
- Nois: Controls the noise level in the flame effect.
Vacuum

This feature is handy to create stretching or compressing effects. Select the shape layers to apply tension to activate the" Tension" feature. A guide layer named "Tension" will be automatically generated, offering a slider for the following control:
- Vacuum: Sets the tension applied to the shape layer. The range is from 0 to infinity, with higher values resulting in more tension.
- Complexity: Number of points dynamically added / Created curved segments
Tornado

It is designed to offer intricate control over the arrangement of layers in a tornado-like pattern. You can use guide layers to adjust the tornado effect's frequency, height, width, and orientation. Controls:
- Frequency: Determines the number of twists in the tornado.
- Height: Adjusts the vertical scale of the tornado.
- Width: Modifies the horizontal scale of the tornado.
- Orientation: Alters the angle of the tornado and mimics a 3D view/animation
- Speed: Controls the tornado"s rotation rate.
- Segments Curvature: This allows you to adjust the curvature of the tornado"s segments.
Important:
In using "Tweaks" for animation adjustments, it's important to note that certain features may require manual input for optimal results.
Specifically, you might need to set the first vertex by hand to ensure the animation flows as intended. This step is crucial for aligning the animation path with your creative vision. As you can see in the animation on your right, how vertices are set can significantly influence your animation's motion. Careful placement of the first vertex sets the foundation for the animation's direction and fluidity.

Tab Shapes/Layers:
Whether you're looking to create complex animations involving shape deformations with "Swallower" or you want to arrange layers in a faux-3D carousel using "Carousel in Depth," this feature set has you covered.
"Magnetism" and "Repulsion" allow dynamic interactions between layers and guide layers, simulating natural forces. "Hi! Bye!" offers a unique way to animate layers through magnetic noisy displacement. At the same time, "Layers Spinner" provides a straightforward control for rotating layers around a guide layer. If you want to manipulate effects, "re-drop Sadow" gives you granular control over the Drop Shadow effect.
Finally, "Faux Depth" allows you to add depth to your layers, complete with controls for scale, delay, decay, and blur. Each feature is designed to offer maximum customization, often through guide layers and various controls, making it a versatile toolkit for any motion design project.
Layers Spinner

When you select the layers you wish to rotate, the tool automatically creates a guide layer named "Layers Spinner".This guide layer provides a single but powerful control:
- Rotation: Determines the rotation angle of the layers around the guide layer.
Faux Depth* (Now in POINTS/Paths)
Select the layers you wish to manipulate to activate the "Depth" feature. The tool will then automatically generate a guide layer named "Depth". This guide layer comes with a "Scale Factor" control:
- Scale Factor: This control allows you to set the scaling factor for the layers, ranging from 0 to 200. The control is dynamically linked to the scale of the guide layer, offering an additional layer of customization.
- Blur Factor: This control allows you to influence the blurriness according to the distance. You can also scale up or down the guide layer to fine-tune your setup.
- Delay: A 0.1-second delay is applied to each layer, creating a staggered effect.
- Exponential Decay: A decay function is applied to both the scale and rotation of the layers, providing a natural and smooth transition.
- Blur Effect: A Gaussian blur is applied to the layers, and its intensity is related to the scale.
Hi! Bye!

The "Hi! Bye!" is designed to create a magnetic attraction and repelling effect between layers and a guide layer. This feature allows you to control the strength and direction of the attraction, offering a dynamic way to animate layers. To use this feature, select the layers you wish to animate. The tool will automatically generate a guide layer named "Hi! Bye!" This guide layer serves as the centre of attraction for the selected layers. The distance and direction of each layer to this guide layer determine the strength and direction of the attraction.
Carousel in Depth

Select the layers you wish to arrange to use the "Carousel in Depth" feature. The tool will then automatically create a guide layer named "Carousel".
This guide layer is equipped with several controls:
- Vertical: A checkbox that toggles the orientation of the carousel between horizontal and vertical.
- Min Scale: This allows you to set the minimum scale for the layers in the carousel.
- Max Scale: Enables you to define the maximum scale for the layers.
- Tracking: Controls the distance between the layers in the carousel.
Repulsion/Magnetism
Create a repulsion effect between layers and a guide layer. Upon selecting the layers you want to animate, a guide layer named " Shape Repulse" will be automatically generated. This guide layer acts as the centre of repulsion for the selected layers.
To utilize the "Magnetism" feature, you"'ll need to select the layers you wish to magnetize. Once you"'ve chosen it, the tool will automatically create a Magnetism guide layer. The layers will then be attracted towards this guide layer based on their distance from it. The attraction strength is dynamically calculated, ensuring a natural, magnet-like effect. The closer a layer is to the guide, the stronger the attraction.
re-drop Sadow
Allows you to manipulate the Drop Shadow EFFECT of layers in a highly customizable manner. Using a guide layer named "Drop Shadow Tweak", you can control the drop shadow's direction, distance, and softness. The "Bake" button can generate keyframes for further customization.
When selecting the layers you want to modify, the tool automatically creates a "Drop Shadow Tweak" guide layer. This guide layer offers the following controls:
- Drop Shadow Direction: Determines the angle of the drop shadow.
- Drop Shadow Distance: Sets the distance between the layer and its shadow.
- Drop Shadow Softness: Controls the softness of the shadow edges.
Spreaders:
"Spreaders" are designed to distribute layers in various patterns like cross, spiral, T, pyramid, Y, X shapes, etc.
Using guide layers, "Spreaders" provide dynamic spacing, elasticity, and rotation controls. These controls are not static but linked to the guide layer's scale for added customization. "Tweaks" sorts the selected layers by their index. It then calculates the number of rows and columns needed for the arrangement. The "Spacing" slider influences the position of each layer. Time-based easing is applied, and an elastic ease is used if the "Elastic" checkbox is checked. Finally, the layers are rotated based on the "Rotation" slider value. The "Bake" button allows you to convert these settings into keyframes for further fine-tuning.
Spread as Rect

Spread as Circle

Spread as Triskle

Spread as Cross

Spread as Spiral

Spread as Pyramid

Spread X

Spread as Hexagon

Spread as Heptagon

Spread as Octogon

Spread as H / I

Spread as T

Unique feature: Upward!
"Upward" was built to simulate the physics of objects being lifted by a traction force. This feature allows you to manipulate parameters like gravity, traction, rope stiffness, and wind speed to create upward movements. This feature also offers controls for elasticity, pendulum amplitude, and damping to add nuanced behaviors to the animation. Select the three layers acting as the Traction, Rope, and Weight in your animation. Once selected, a guide layer named "Upward" will be automatically generated, containing sliders for the following controls:
Select first the weight > the the link (must be a path or shape) and then the traction layer.
- Speed: Adjusts the speed of the animation.
- Gravity: Sets the gravitational force affecting the objects.
- Traction: Determines the upward force applied to the objects.
- Stiffness: Controls the stiffness of the rope.
- Elasticity: Modifies the elasticity of the rope.
- Wind: Adds a wind effect to the animation.
- Swing: Controls the amplitude of the pendulum swing.
- Damping: Sets the damping factor to control energy loss in the system.
| After Effects | 2024, 2023 |
|---|
1.2.7 (Current version) - May 4, 2024
1.2.6 - Apr 25, 2024
Deleted:
"Opacity Wizard".
Replaced by (more obvious):
"Opacity Reducer" & "Opacity Amplifier"
Added:
"Desaturator"
"Blur Wizard"
1.2.6 - Apr 25, 2024
Deleted:
"Opacity Wizard".
Replaced by (more obvious):
"Opacity Reducer" & "Opacity Amplifier"
Added:
"Desaturator"
"Blur Wizard"
1.2.5 - Feb 5, 2024
1.2.3 - Jan 24, 2024
1.2.2 - Jan 22, 2024
1.2.1 - Jan 21, 2024
1.2.0 - Jan 15, 2024
New Options
1.0.9.9 - Jan 8, 2024
Added: Same size, Explode/Implode and New UI
1.0.9.8.1 - Jan 5, 2024
Added: Shape rotation and X-axis displacement are now integrated into the Burst feature.
1.0.9.8 - Jan 4, 2024
1.0.9.7 - Dec 27, 2023
1.0.9.6.1 - Dec 21, 2023
color Morphing.
Now create shapes from Primitives, Text and Vectors.
1.0.9.6 - Dec 20, 2023
New: Button to turn primitives in Bezier!
Fixed Legacy
1.0.9.5.1 - Dec 1, 2023
1.0.9.5 - Nov 30, 2023
Check if guide layers are necessary.
Fixed the text on the Grid Maker
Minor changes
1.0.9.4 - Nov 30, 2023
Fixed the text on the Grid Maker
Minor changes
1.0.9.3b - Nov 27, 2023
1.0.9.3 - Nov 27, 2023
1.0.9.2 - Nov 26, 2023
Minor Improvements
NEW: Tweak Speed
Turn a single Text Layer on the fly
1.0.9.1 - Nov 25, 2023
NEW: Markers Based on Your PlayHead
NEW: Tweak Speed
1.0.9 - Nov 25, 2023
1.0.8.9 - Nov 22, 2023
1.0.8.8 - Nov 20, 2023
1.0.8.7 - Nov 17, 2023
Grid Maker to distribute your shapes and work with Tweaks
1.0.8.6 - Nov 17, 2023
1.0.8.5 - Nov 16, 2023
1.0.84 - Nov 13, 2023
1.0.83 - Nov 12, 2023
1.0.82 - Nov 12, 2023
1.0.81 - Nov 12, 2023
New Polymorpher
New documentation
1.0.8 - Nov 11, 2023
1.0.7 - Nov 10, 2023
--NOW BREEZE: Keeps the curvature of your shapes.
1.0.6 - Nov 9, 2023
1.0.5 - Nov 9, 2023
1.0.4 - Nov 8, 2023
1.0.3 - Nov 8, 2023
1.0.2 - Nov 8, 2023
1.0.1 - Nov 7, 2023
1.0.0 - Nov 7, 2023
-

- Compatibility After Effects
Advanced Selection
Add to CartExpands the capabilities of After Effects to select layers. It offers a vast amount of filters you can choose from to narrow down your selection, like layer types, layer options, blending modes, search by name, label colors, and more.
-
- Compatibility After Effects
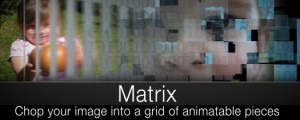
Matrix
Takes a layer in your comp and breaks it into pieces. You choose the size of the pieces, whether to animate in order or random, and how long you want the transition to take.Add to Cart$14.99 As low as: $11.99 -

- Compatibility After Effects
Super 3D
Add to CartEnhance your 3D capabilities in After Effects with Super 3D.
-

- Compatibility After Effects
Staircase
Add to CartQuickly stagger, sequence and randomise blocks of layers.
-

- Compatibility After Effects
Super Resize Me!
Name Your Own Price!Add to CartBatch resize After Effects projects.
-

- Compatibility After Effects
LoopMaster
Add to CartMake seamless loops! Loop keyframes, items, wiggle, spin and orbit. Perfect for GIF's, NFT's, Lottie Animations and Social media posts.
-

- Compatibility After Effects
voodoo
Add to CartAnimate pins easier. Period. Solution for the puppeteering woes of the digital age: The Seamless Puppet Tool puts the "fun" in function, as it effortlessly unlocks creative freedom with its refreshingly unpretentious pin tracking and conjuring controller abilities. Prepare to be enchanted!
$18.00 -
- Compatibility After Effects
GuidesUp!
Add to CartCreate a magnetic 3D isometric Map in 1 click, set up Golden Ratio Guides, 16:9 Guides, Hex Map...And above all, manage items, anchors and guides like never before!
$14.99 -

- Compatibility After Effects
Pencil Park Bundle
Add to CartGet Reach: AEsstential Kit + Volume n' Tricks 2 + Tweaks together, and save 33%.
A unique workflow improvement offering with a huge discount.Regular Price: $112.00
Special Price: $75.00
-
- Compatibility After Effects
breakdowns
Add to CartANIMATORS: Effortlessly Label, Export & Organize your animations. Also Great for creating Behind the Scenes renders of your project.
Designed for animators working with vertical stacks of layers. It streamlines your workflow by automatically labeling, exporting, and organizing your layers + a video, without cluttering your project or altering your work, allowing you to focus on creating without manual hassles. Experience seamless integration with Photoshop-style organization and added benefits like customizable labeling and layer order.
$9.99 -
- Compatibility After Effects
REACH
Add to Cart
Ready to take your motion design workflow to uncharted territories? Reach is an all-encompassing, adaptable, and ever-evolving toolset.
It infuses the After Effects toolkit with a medley of uniquely innovative utilities. From elementary to intricate, Reach takes the expected and elevates it into the realm of the extraordinary. Simplify the complex, streamline the cumbersome, and catalyze your creativity with Reach - the quintessential companion for every After Effects adventurer
Elevate your art. Reach for the stars.$42.00 -
- Compatibility After Effects
skinAnchor
Style Up! Pimp your workspace while effortlessly adjusting your Anchor Points across your timeline, ensuring your animations are spot-on with minimal fuss.Add to Cart$9.99