Beatnik FAQ
BEATNIK FAQs
Note for CS6 Users:
Beatnik works perfectly on AECS6, but due to circumstances beyond our control, the selected Waveform icon does not show up on the UI. Instead, you will see the waveform’s name (Tracking or Impulse).
Basic Automatic and Manual Selection rules
Automatic - Select 2 layers - one with audio and video switch off (if it has video).
Markers - Select 1 layer only.
Sync - Select 2 layers. If one is an audio layer, then Beatnik will use that as the default Reference. If both have video, then first selected will be the Master...think "Sync this to that".
Understanding Beatnik and Video Speed
Beatnik relies on the audio layer to dictate the overall running time of the video. If the video and audio are different length, the results might be different than what you might expect especially since the video layer is pre-comped and what it’s doing might not be apparent. Here are a few basic set ups and an explanation of the results:
Basic build - the video and audio are the same length. Results: video's total run time will match the original.

Video is shorter than the audio: Results: Video will cut to black halfway through.

Audio is half the length as the video, work area set to audio length: Results: Video will only playback half the original length.

Audio is half the length as the video, work area set to video length: Results: Video will be double speed. See "what to do if Time Remapping is too sublte" for more details

How to move, add or delete markers
Once a build is complete, Markers can be moved, added or deleted. However, if the total number of markers for the reference and master don’t match, you will get a pop up warning. If you proceed, there’s a good chance that there will be a freeze at the end, or the video playback will be incomplete.
What happens if the number of markers on the Master and Reference aren't the same.
It’s possible to have unequal number of markers if the markers are generated in the manual mode. A warning will pop up if that’s the case when you build using Sync.
- If there are more markers on the Master, then Beatnik will only use as many as exist on the Reference, resulting in only partial playback
- If there are less markers on the Master, then the video will freeze part way through playback
- If possible, match the number of markers on both layers. Use Number Markers to help.
Keyframes and Manual Marker Mode
If you're manually applying markers on a layer that has keyframes, pre-comp it first. Since Sync applies time remapping and expressions to that layer, if it's not pre-comped first, time remap will have no effect on the keyframes.
Squeeze & Stretch Explained
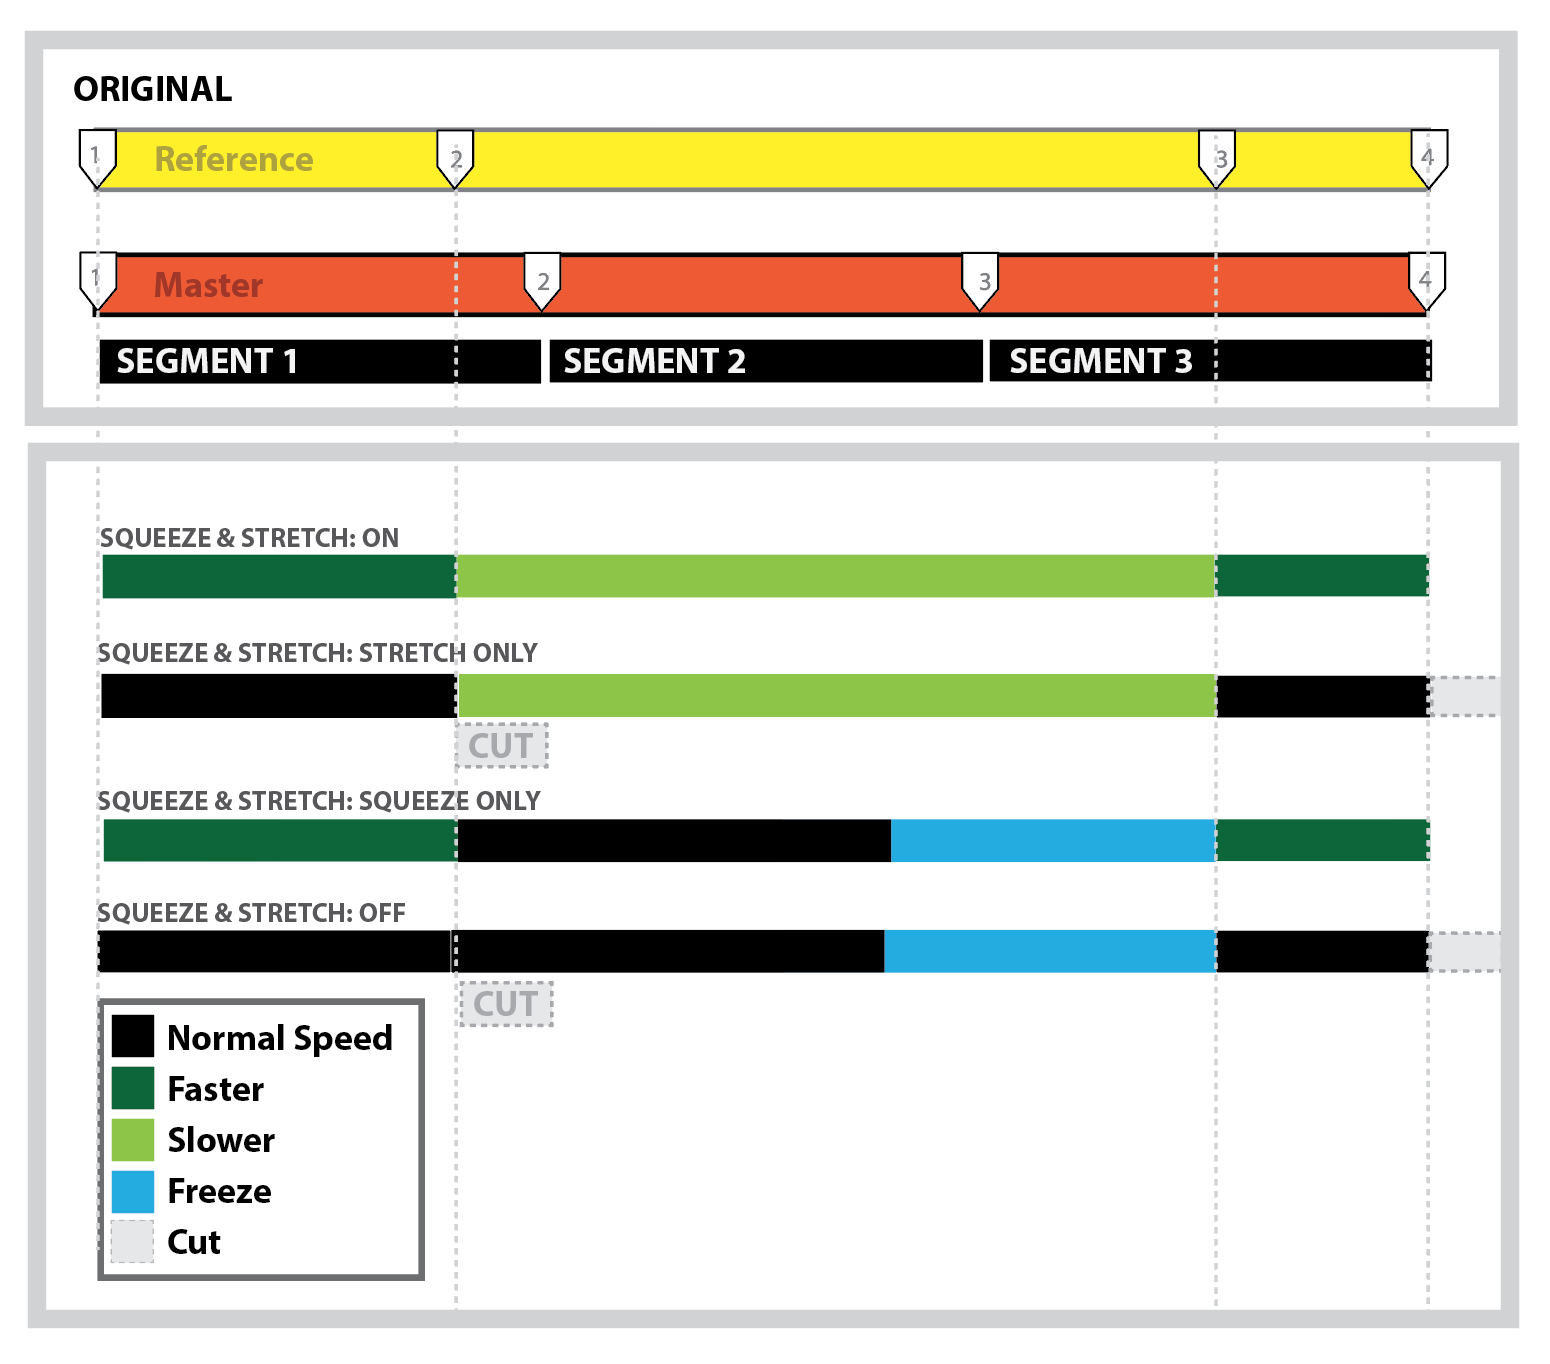
Retime's Squeeze and Stretch control how Beatnik addresses Time Remapping. When On is selected, it operates as you would expect - it slows down or speeds up the video, as necessary. We've included a few other variations that might give you unexpected results, so we created a chart to help explain them.
When Stretch Only is active, the video will have normal speed video interspersed with slowed down video. Instead of speeding up the segments when necessary, it will make an edit, and cut to the next marker location.
Squeeze Only will allow for sped up video, but instead of slowing down when necessary, it will freeze the video until it hits the next marker.
Lastly, when Retime is Off, then it will both Freeze and Cut the original footage, resulting in the most frenetic effect of the lot. It’s great for skateboard videos.
We've included a line to separate the settings that will result in freezes (below the line) and those that won't (above the line)- since it might not be readily apparent.
The Beat Detector will place its first marker on the first peak of the audio. This might result in a freeze at the beginning of your video. You can use a few strategies if this is not what you’re looking for:
A) Add a marker at the beginning of your yellow reference layer. You may want to add a marker on the orange master layer to keep the numbers equivalent in order to avoid a freeze at the end. You could add this after the work area.
B) Move the first marker on the reference to 00:00, although this might cause problems with slowing down video too much or missing the first beat.
C) Fudge it—You can place a clean section of the non-time remapped master video on the layer above to cover it up.
What to do if the Time Remapping effect is too subtle
There are many reasons this could happen, including that the beats are too close together, which would create too many tightly spaced markers or that the video has too little movement.
You can try a few strategies:
A) Adjust the interpolation and rebuild.
B) Lower the number of reference markers (use threshold, sensitivity, toolbox)
C) If your video is long enough, extend the comp past the audio, and extend the work area to include the longer clip. This will allow Beatnik to space the automatic makers farther apart on the master, so that it will have a wider range of time to work with. This will result in speeding up the video, but it might work well if combined with a higher interpolation.
If you duplicate a build, or one of the layers, expressions will always relate the to the original reference layer. If you want to duplicate the build and have a separate control, then duplicate the comp.
The Senstivity slider (also known as Damping) is part of the tracking algorithm used to analyze more active tracks. It is represented by the complex waveform icon. This algorithm is best suited to audio that has been highly compressed (such as commercial music tracks) where the average audio level doesn’t immediately return to zero after a peak. Damping is designed to dynamically track the average level as it decays towards zero and the algorithm will look for peaks above that calculated average. Try to adjust the damping parameter to match the compression of the audio.
The upshot is that it makes the algorithm more sensitive and tries to create a marker pattern more conducive to the time remapping effects
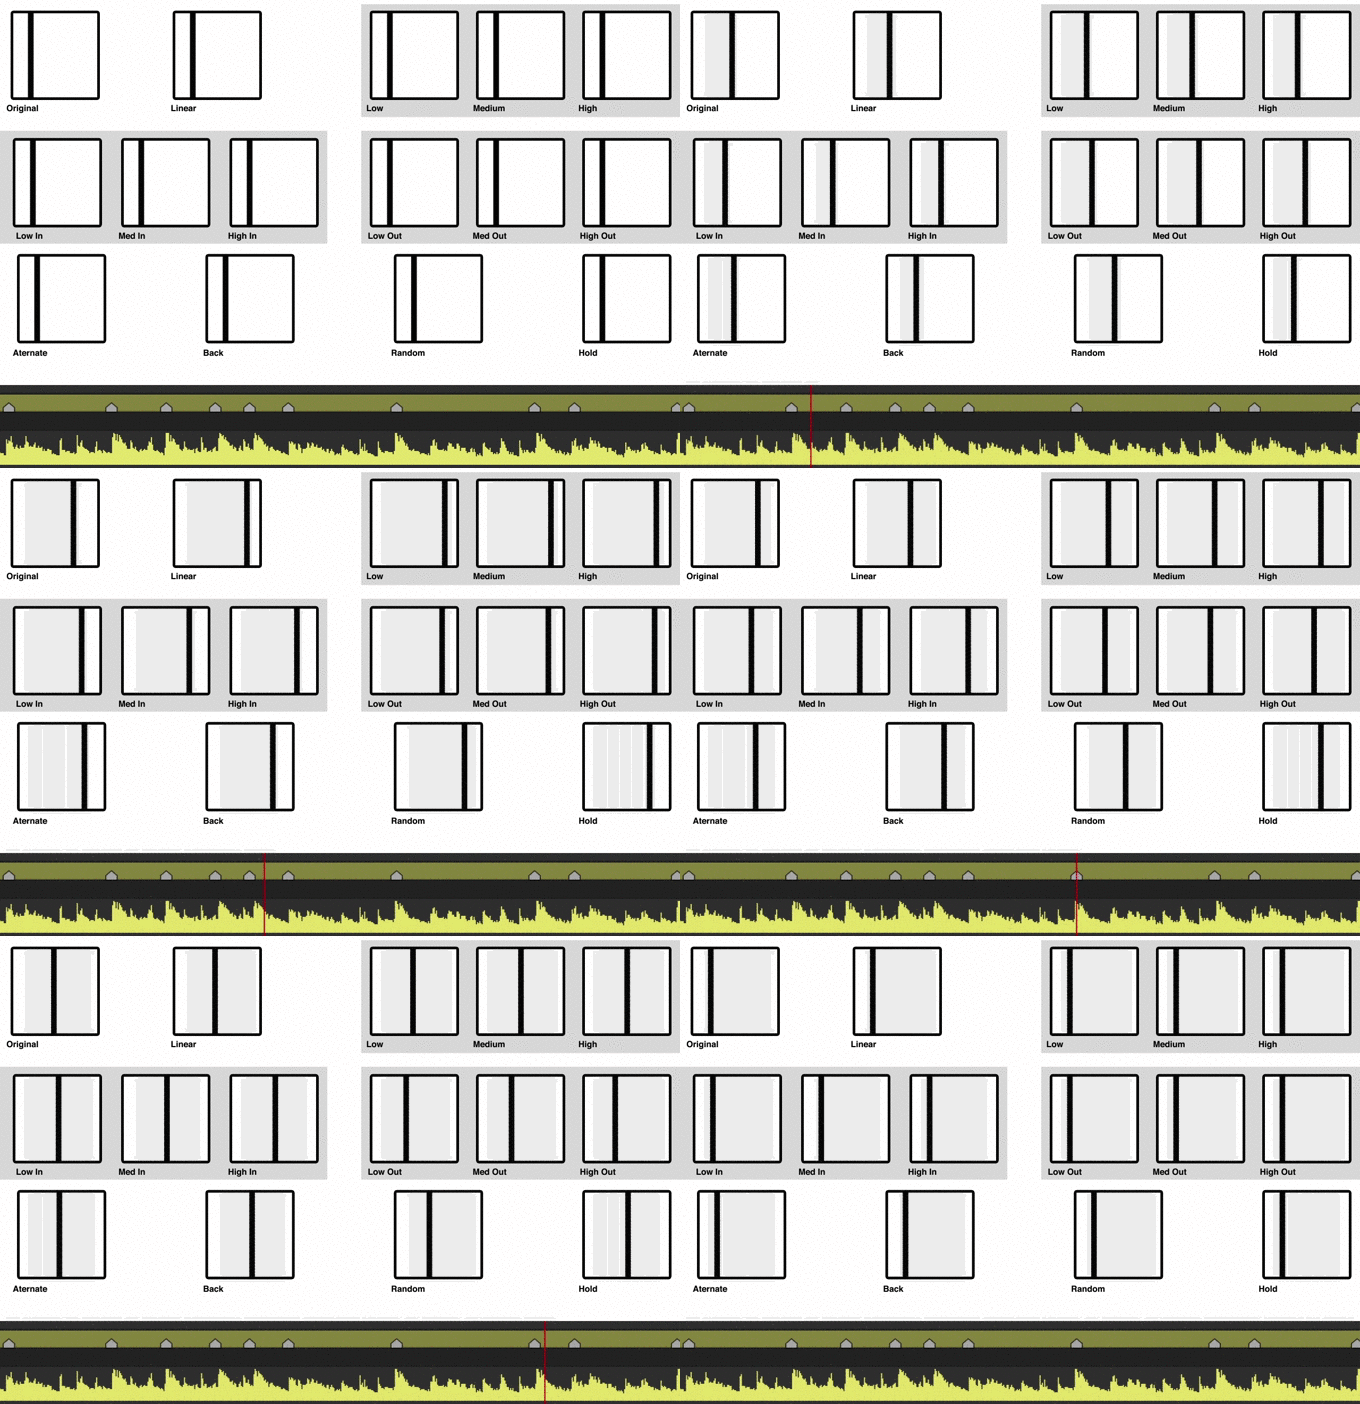
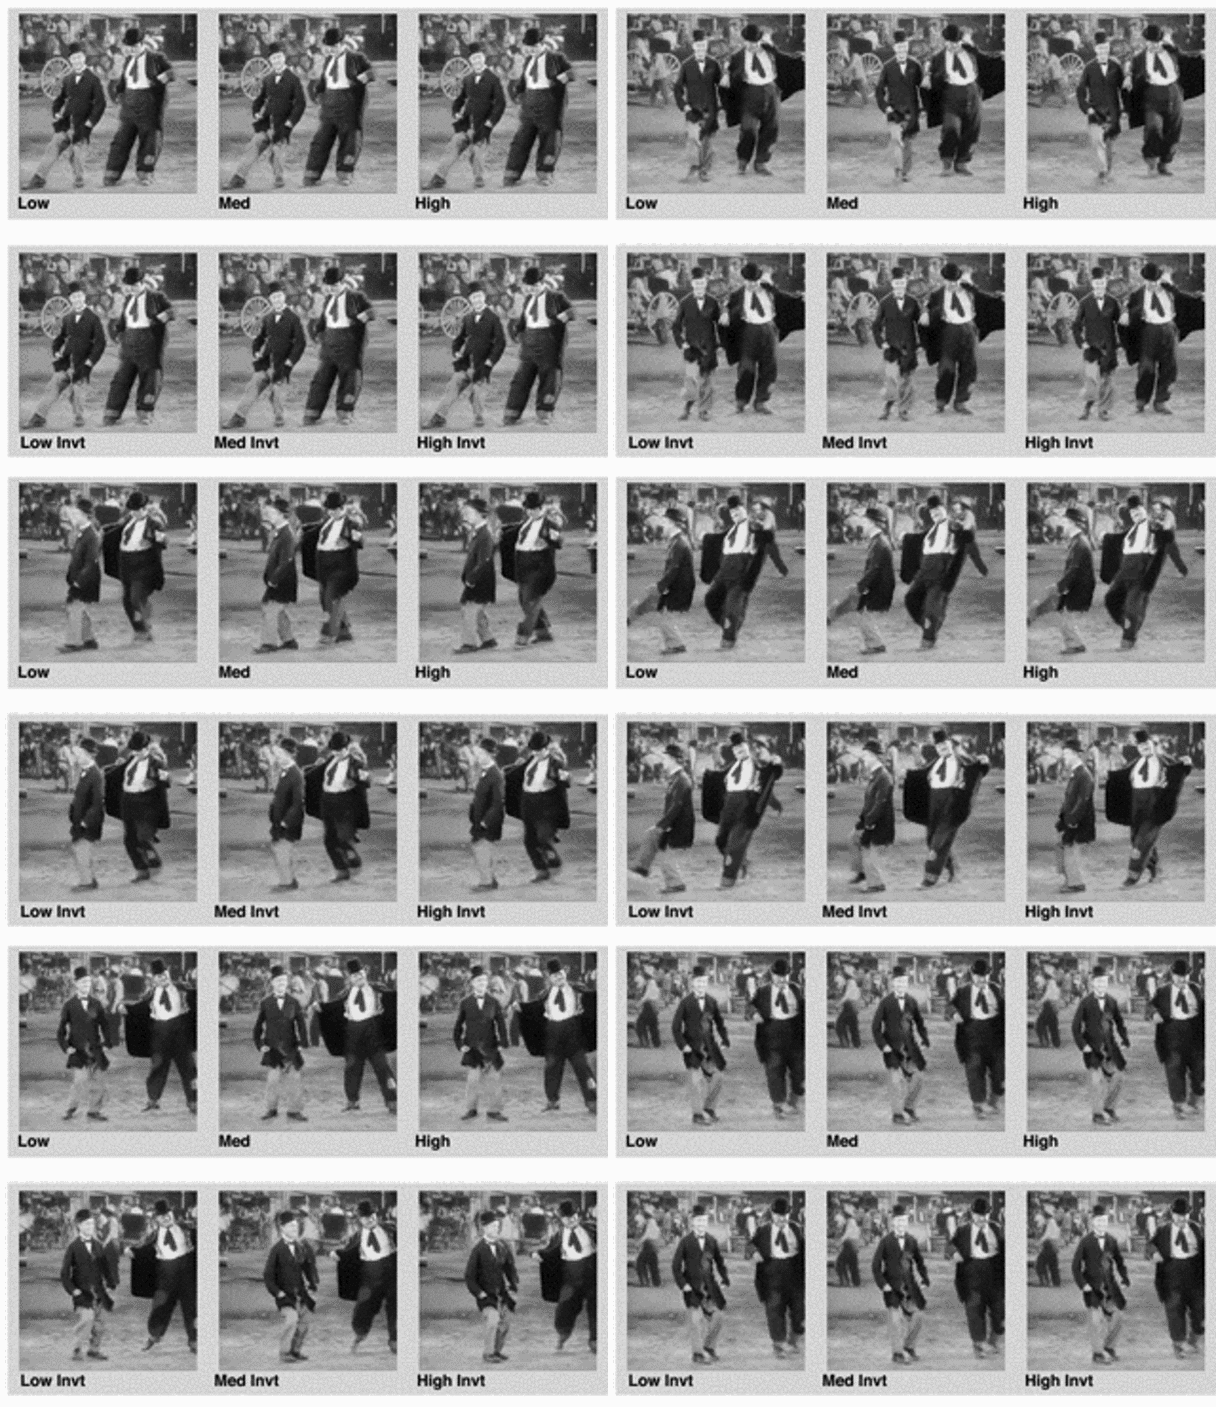
Stop Eases are typical in-and-out eases. The result is that the video pauses at each marker. A Go Ease is just the opposite- its Inverted…the video pauses between markers and the motion is on the marker. We found this to be a better default setting, but there will be times where a Stop Ease is desired, so both are included.
Below are examples of Stop Eases (Top) and a Go Eases (Bottom). They are synced to the same timing.
What can you do if the Beat Detector isn't detecting the peaks of your audio:
If Beatnik is not placing enough or too many markers on the reference layer, you can try a few strategies:
1) Increase the audio level of the track (type L on the keyboard).

2) Keyframe the audio level to increase in the lower level parts. If there are sections in the audio that are at distinctly lower or higher levels you can also try keyframing the audio levels to be more balanced. Once you have run Beatnik, you can delete the keyframes and revert back to the original settings.

3) Split the Reference into distinct sections and apply Beat Detect to each in Marker Mode. Then combine them all into one using the Move Multiple Markers in the Toolbox.
4) Manually delete or add markers.
What if Beatnik doesn't recognize your audio layer:
In order for the script to see your layers, make sure the selected audio layer has the video switch turned off.
What is Manual Mode and why would you use it?
While there’s nothing in the UI that actually says manual mode. It refers to a method of working that allows for more flexibility in controlling the time remapping by applying custom markers to both the Reference and the Master. In Auto mode, markers are distributed evenly across the master layer. Manual allows you to override that and have it distributed any way you like. .
Misc. Bonus Tips
