MonkeyWords FAQ
MonkeyWords FAQ
https://aescripts.com/monkeywords
THE MISSION: To create a script that harnesses the power and flexibility of AE's native text animators to create a user-friendly system for generating kinetic text animation.
OVERVIEW: When you click Do It, MonkeyWords places a series of text layers in comps (aka Pages), each with a group of text animators applied based on the UI settings. Those pages are then sequenced in the master comp.
Each text animation is broken down into two basic parts – the Transition and the Hold. The Transition section is made up of the Speed, Interpolation, Text Offset settings, as well as the Style & Fade animators. The Hold time only contains only the Drift animator.

SPEED: Speed relates to the length of the transition in and/or out. This dictates the length of the Style, Fade, Tracking, and the Auto Text Offset setting. The list corresponds to these values: Very Fast: 10 frames / Fast: 15 frames / Medium: 20 frames / Slow: 40 frames / Very Slow: 60 frames

INTERPOLATION
Ease: When Ease is selected, it applies an Ease Out to the Transition In, and an Ease In to the Transition Out
Ease Invert does the opposite, resulting in a snappier animation.
Random will assign Ease, Invert Ease or Linear to a page, but won’t combine them into a single page.
Inertia: Inertia, isn’t really an interpolation – we had to fake it because of the Text Animators limitations. Instead, we cobbled together a system based on a trick we saw on a School of Motion tutorial (https://www.schoolofmotion.com). Inertia only applies to position-based transitions, so its deactivated if the Scale or Rotation styles are used – as well as Random Styles – which has the potential for those two being used.

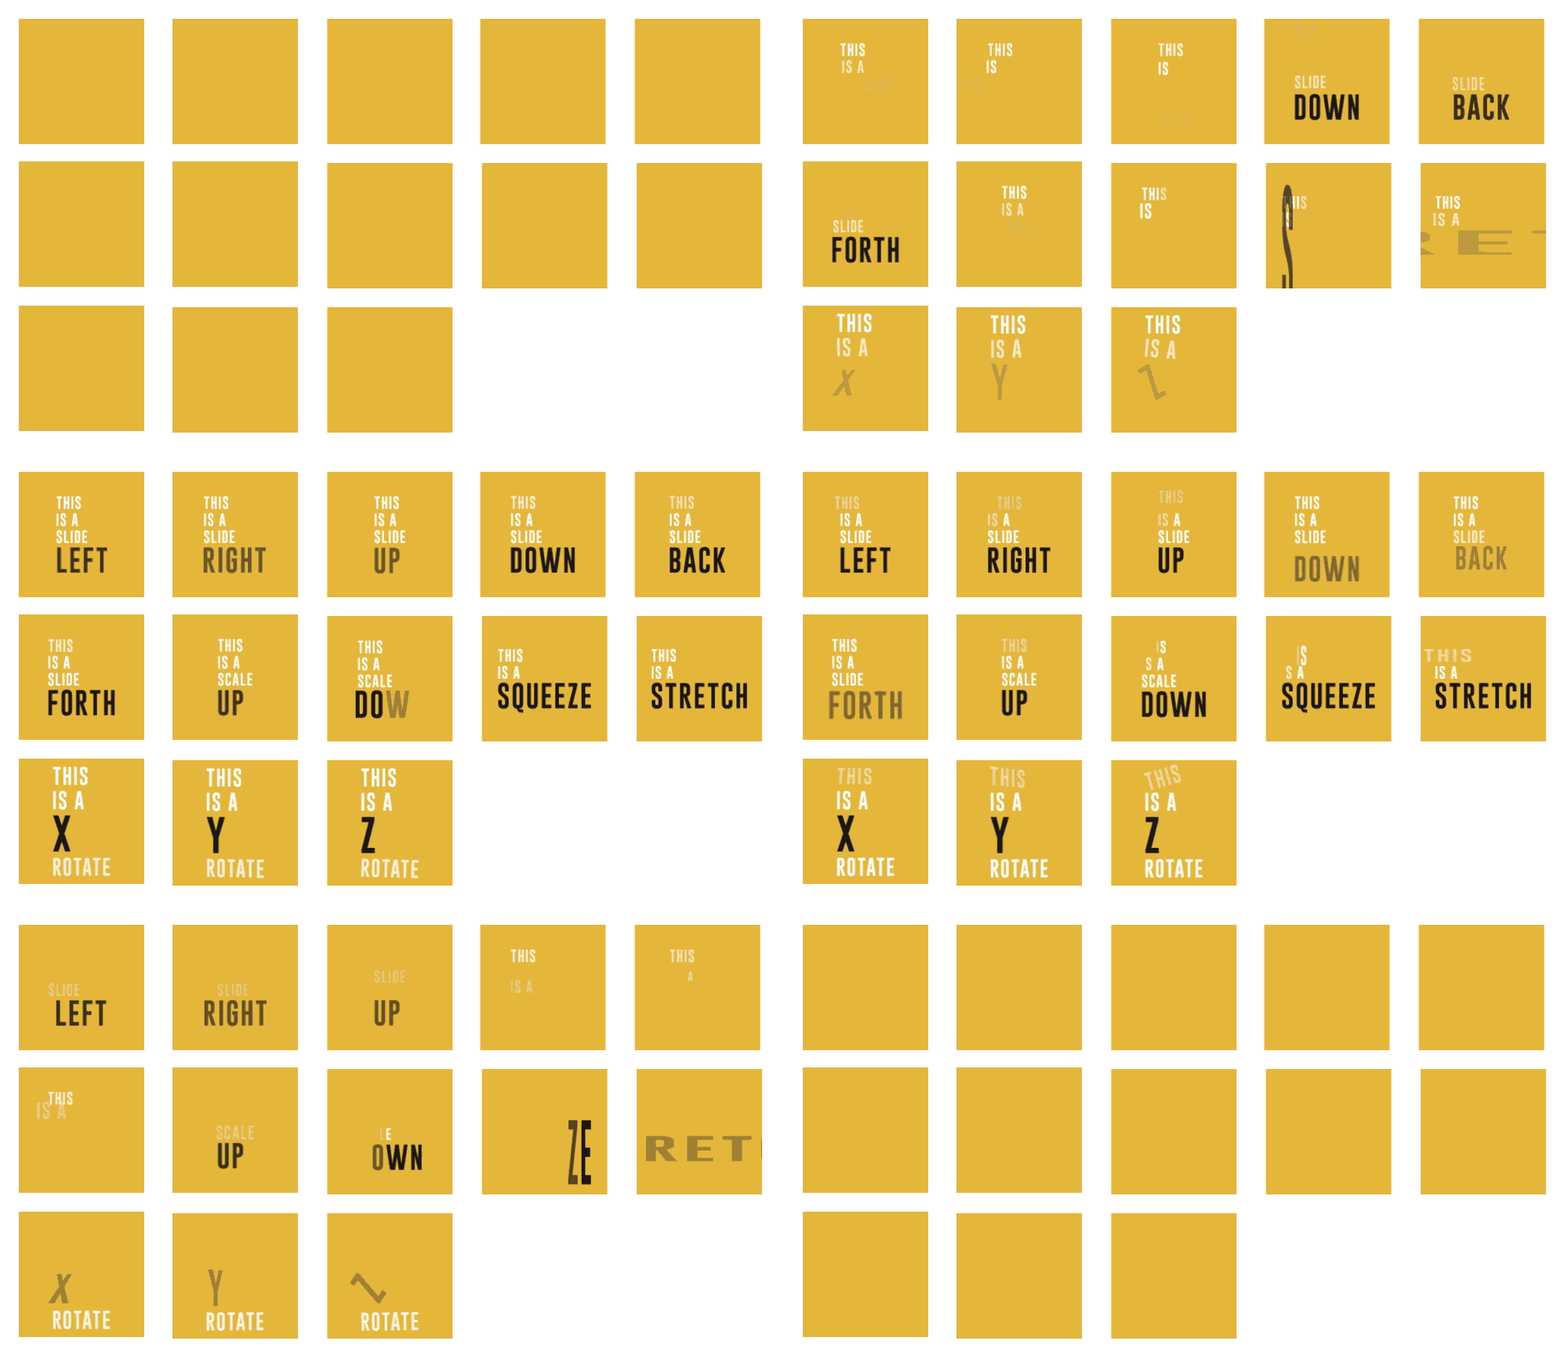
PRIMARY STYLE: This is how the non-keyword text animates. Keep in mind that keywords aren't needed at all. This script is great at just creating simple animations really quickly too. This dropdown assigns all the Position, Scale, and Rotation Animators to the text layers. Most of these are self-explanatory…but a few of the Random and Combination options need some expanding upon.
The Random Moves don’t include all the options in the dropdown. We were selective and only chose a mixture that worked well together. That’s why
That’s why a Squeeze or Z Rotation won’t be seen popping up in a random mix….But if you want to include those, it's easy enough to create individual builds and swap them out as needed.
The Combo moves are natural groupings, such as Squash and Stretch and X&Y Rotate. These are assigned per page, not per layer. The way you can get multiple moves per page is to designate several lines as keywords.
All these moves can be adjusted in the Effects Controls. We set them on an average default setting, but they can be made more or less intense, random, by increasing or decreasing the ease.
Just keep in mind that these controls only relate to the transitions. The Drift has its own controls. If a change isn’t seen in the animation, then the wrong slider might be getting adjusted.
Anchor point controls have been placed on Rotation and Scale styles and can manually be changed after the build, or automatically randomized by checking the box under the text panel. This can make even a simple series of rotations or scales more interesting.
Off will disable the transition move, but Drift and Cut/Fade are still possible. Don’t get confused if you disable the move and it's still moving…this is different than Transition Off, which will disable all the dropdowns below it that relate to that part of the animation.

KEYWORD STYLE: This assigns motion to Keywords - designated by the Caret Key (^) before any line in the Text Panel. It is a duplicate of Primary Styles, except for 3 different automatic options - 2 of which reference the Primary Style:
Auto will copy the Primary Style, so the keyword will move in the same way.
Random will yield a random move that doesn’t reference the Primary Style at all
Opposite will make the keyword move in the opposite direction of the Primary Style.
DRIFT: Drift applies a linear motion to the text layers and lasts the entire length of the page. It's a separate animator altogether. There's no Scale or Rotation Drift…just a Position Drift. As with Keyword Style, it has Custom and Random options. The default Auto setting - in general - continues the Transition motion of that layer. If a rotation or scale is assigned to that text layer, then it’ll default to horizontal, or back & forth.
Drift is set up to reach the original layout at the midpoint of the timeline. It can be keyframed to 0 if you want it to come to a stop at that point. Also, keep in mind Drift can turn it off which would keep the text stationary after the transition resolves.
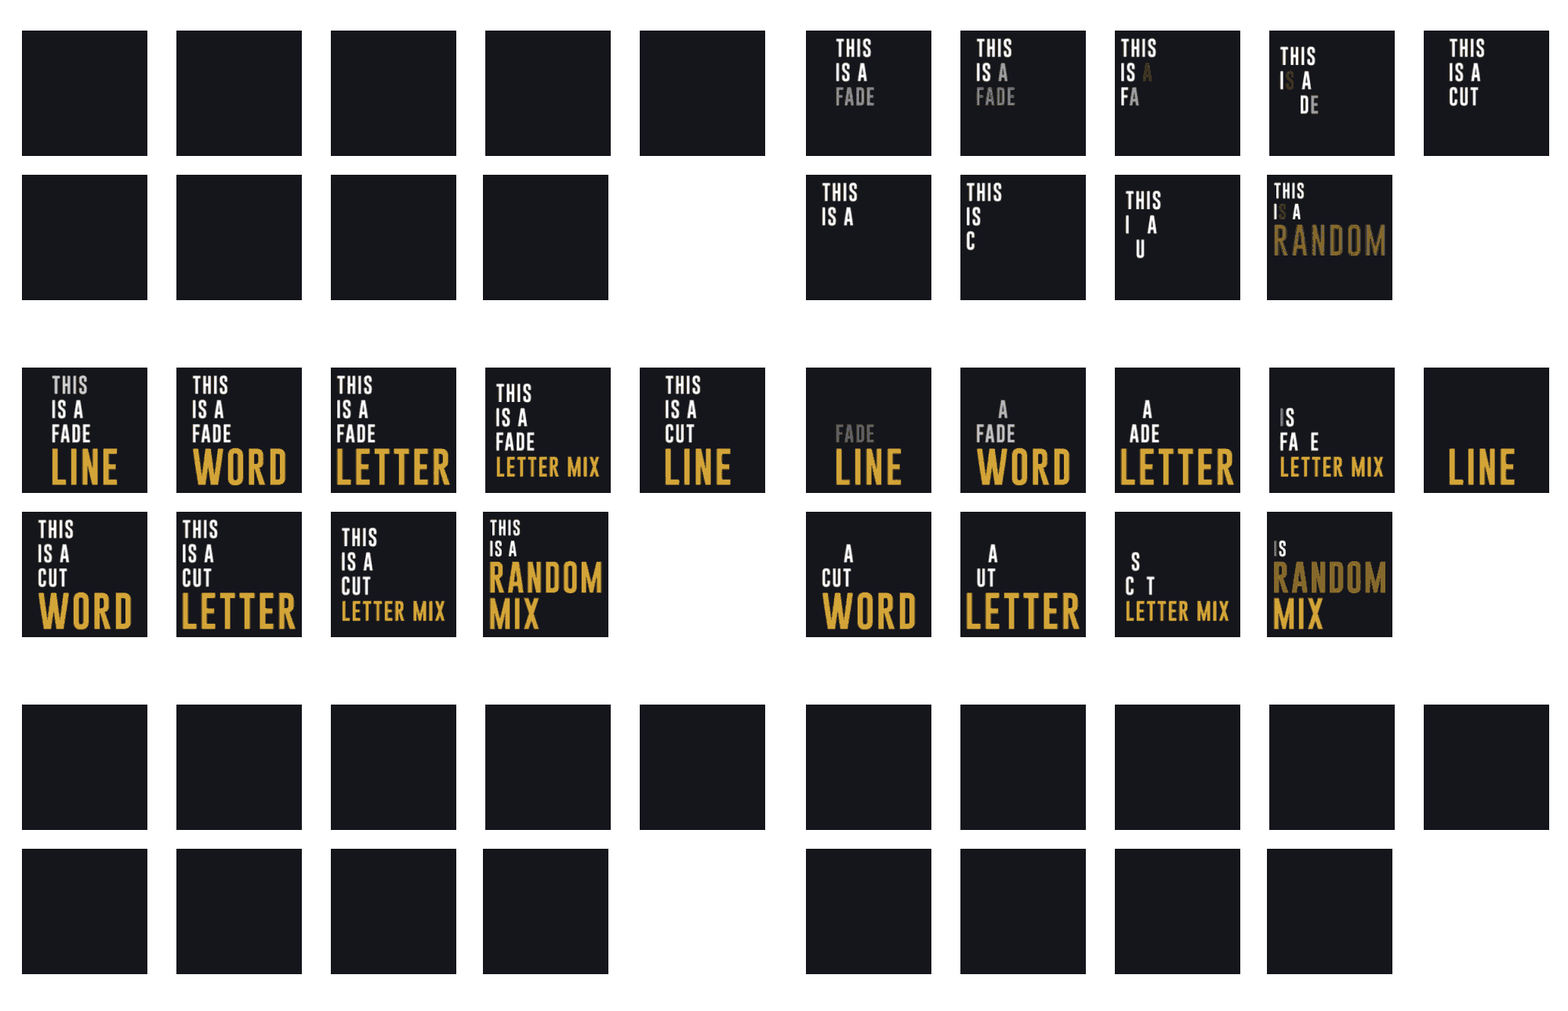
CUT/FADE: This places an opacity animator on each layer. Its length is based on a percentage of the duration of the Transition time (or Speed setting). We built in a number of options which range from letter, word, or line operators, and random order or mixed order and differnet combinations of each.

TEXT TRACKING: This animates the kerning of the text. The timing is tied into the speed setting, and the amount and ease are controlled by the Effect Control. Please keep in mind that the direction it moves is based on AE’s paragraph panel. So if letters that kern to the left are desired, choose a flush left alignment.
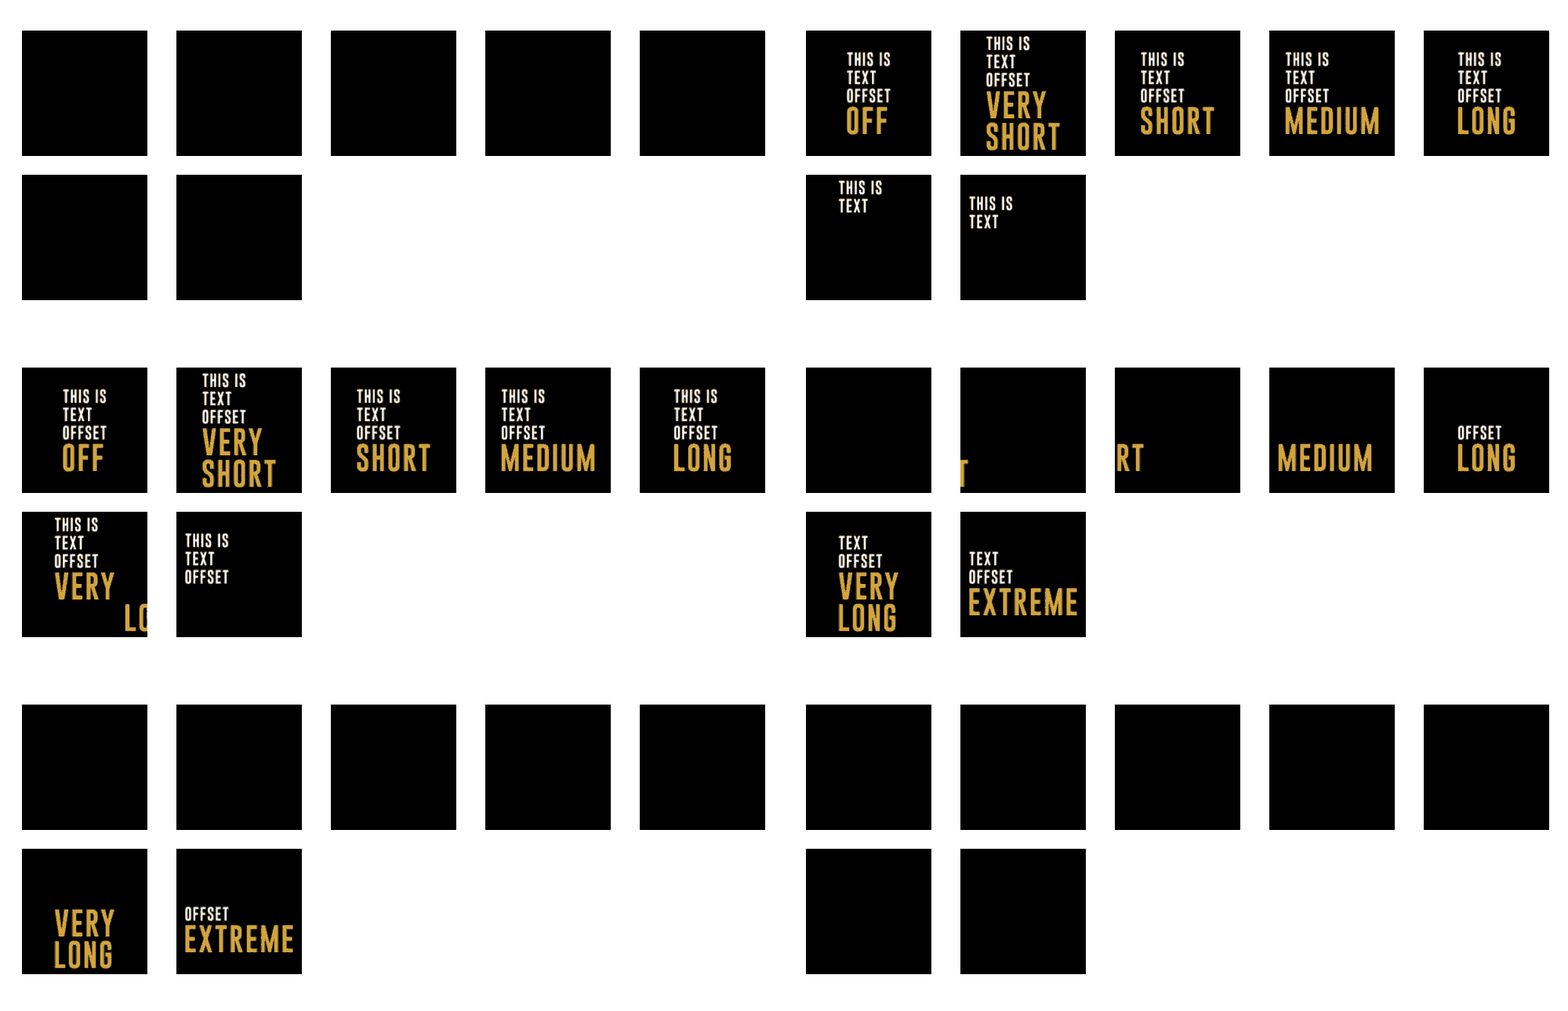
TEXT OFFSET: This controls how long it takes to trigger the text layers which are designated by markers in the pages themselves. You can slide the markers around and change the trigger points.

PAGE OVERLAP: This is how much a page overlaps the previous page and is only enabled on Transition In & Out. The auto setting for this is based on the Text Offset setting - the longer the offset, the more the overlap. There's no full-proof way of doing this, since a layer on a new page might end up covering up a layer on a previous page…so if Retime is off, you can also manually slide these around too...as well as Text Offset markers within the page.
RANDOMIZE ANCHOR: This varies the anchor points on Rotation and Scale animations. One anchor point will be assigned per page unless both Primary and Keyword Styles are each assigned a Scale or Rotation motion, in which case each will have its own anchor point controls.
Active Anchors for Y and Z Rotation are Left, Middle and Right | Active Anchors for X and all Scales are Top, Middle, and Bottom

RETIME PAGES: When active, this will precomp the pages in a build, and place markers on transition points to make time adjustments easier. Tip: If you have a wide range of page lengths, you should consider building them individually...Retime Pages is best for tweaks.
MARKER SYNC: This is only possible when Retime Pages are active. Marker Sync will align the Retime markers with a pre-existing marker layer. This works well with VO, Music Lyrics and beats.
SAVE: This will create a .xml file that will save the current state of the UI. We suggest saving a Default file to save on your system to easily reset your UI. *Important Note: It will not save the contents of the Text Panel. That will need to be saved in a separate word doc.
MISC NOTES:
-If you encounter unusual line-break, ignored key commands or page break issues, theres a good chance you're pasting the text from a 3rd party word doc that might have conflicts with the Text Panel. There are potential undetected line breaks that - while visually are there,they are not recognized in the text panel. To fix this, simply place your cursor in front of the first character in the offending line, delete the space (causing it to become part of the previous line), then reinsert the space. It'll appear the same, but now the text panel will recognize the space.
-Creating a build that is longer than the master comp will result in text layers within the pages getting cut off. These can be extended manually.
- A fill needs to be applied in the Character Panel for Keyword Color to work properly. If only a stroke is selected, that stroke will also apply to the Keyword. That can be changed manually in the page comp.
-MonkeyWords does not animate individual letters or words. It only animates on lines due to the idiosyncrasies of Text Animators. Using Text Tracking and letter or word fades might help if you want to achieve that look.
-MonkeyWords is compatible with MonkeyCam Pro. https://aescripts.com/monkeycam-pro/
A couple of points:
1) Builds need to be done in the pages themselves using the MonkeyWords master control as the marker sync.
2) Make sure when you run MCp to change the order to Bottom (since MonkeyWords places the first layer on the bottom for overlap issues).
3) The MCp maker layer might need to be slid forward a bit to resolve with the end of text layer transition, not the start of it - it'll synch better
3) Position adjustments in MCp effects controls might be necessary to account for drift if that is active.
4) The camera will respond to manual rotation and position adjustments, but not scale. It will adjust to changes in font size made thru the character panel.
5) You might want to experiment with a slower Text Offset
To make the entire animation sync to a beat, VO track, or create a lyric video, you could also use Beatnik to marker sync the page's master layer to a secondary marker layer - and then sync MonkeyCam Pro to that layer as well
https://aescripts.com/beatnik/
Other scripts might also come in handy for the creation of marker sync layers, such as Marker Ramper or 3rd party TextSyncr and Beat Assistant.

