Monkey FAQs
What are the limitations on the trial version?
Where can I download MonkeyTools?
My preview/render is taking forever and I don't have that many layers. Whats going on?
Can I change fonts once the layout is created?
Can I adjust the position/rotation/scale once it's created?
Why do I get errors when pre-comping?
Why isn't there any eyedropper in the color popup box?
Why is my non-English font not working correctly?
How can I pull back so all the text is visible at the end of animation?
I can't get the key commands to work!
Why are there no markers on my control layer and no animation in the comp when I use Marker Sync?
How can I adjust the Dolly position and/or Layer Order?
MonkeyCam Pro, as well as any of the standard Monkeycams that come with our other scripts all have Target Layers that are shy'd after the build. These layers dictate the position of the camera at each marker. By selecting this layer and going into its effects panel, you will see each layer listed in order they are targeted and a corresponding Dolly position. Both of these can be modified manually. You can change the target order by selecting another layer in the dropdown - or push in or pull out by adjusting the Dolly setting. The Dolly position is also keyframable in case you want to animate it.
What are the limitations on the trial version?
The trial version allows for a maximum of 10 words and a 7 day limit.
Where can I download MonkeyTools?
MonkeyTools is a free download that comes with all Monkey products which can be downloaded from 'My Downloads & Licenses'. Find your product TypeMonkey, LayerMonkey, etc, and click on the 'Download' link and you will find it.

My preview/render is taking forever or acting really odd and I don't have that many layers. Whats going on?
Make sure you're not using the Ray Traced 3D or Cinema 4D renderer...use Classic 3D.
You can also try trashing you preferences and restarting.
If you're on a Mac, hold down the Command + Option + Shift keys as you start After Effects, this will allow you to delete the corrupt preference file. On a PC its Control + Alt + Shift.
If that doesn't solve the problem, switch fonts and build a simple project (you can even use the default text in the text box).
Can I change fonts once the layout is created?
Yes, but you have to do it manually. The font and color are functions of the text layer itself. Unshy and unlock the text layer you want to change and make the changes in AE's Character Window.
Can I adjust the position/rotation/scale once it's created?
Customizing position or rotation manually is very easy. You have the choice of altering the control layer or the actual text/image layer. Changes to the control layer will effect the Monkey Cam and its child layers (layers below the selected layer) . Changes made to the text or image layers won't effect those.
To make changes, just click a layer and move or rotate it. It might be easier to unshy the text, image or control layers using MonkeyTools.
If you're new to TypeMonkey or LayerMonkey, it might look a bit odd since if you're adjusting a control layer, you're also adjusting the camera along with it. It might make more sense to you if you switch to a custom view.
One thing to note - resizing a text or and image layer is a bit tricky. Since the camera is parented to the control layer, it'll mimic any changes that are made to that layer. The only problem is that cameras don't have scale controls, so the camera can't change size. This means that the auto-framing will be thrown off if changes to the scale is made.
There are two basic ways of changing size - change the control layer, or change the text/image layer. Since some motions use scale expressions directly on the image or text layer, you won't be able to adjust those easily. In that case, you can either adjust the control layer, or apply a Distort/Scale effect to those layers. Once you do that you can adjust the layout as needed. The best way we found to adjust the auto frame is to manually keyframe the Monkey-Cam Zoom. One other option for adjusting scale is to cheat the Z position. If there's no DOF this might work, and then you don't have to mess with adjusting the Monkey Cam auto-frame.
Why do I get errors when pre-comping?
Monkey scripts are very sensitive. They're based on a lot of complex interacting expressions, so some special care is needed. You can't pre-comp in a traditional way because the expressions will be broken.
What you need to do is to go into the project window and drag the monkey comp into a new comp (the icon at the bottom of the project window). The end result will be a pre-comp, but the expressions will remain intact.
Why isn't there any eyedropper in the color popup box?
The magnifying glass icon (mac only) actually is an eyedropper...click on that and select your color.
Why is my non-English font not working correctly?
Unfortunately, we're not able to test many non-english fonts, so if you're having a problem, try unchecking the All Caps box, it might fix it. If not, let us know.
I have a very long composition, and my computer is choking on all the layers - is there any way to speed things up?
Heres a few suggestions:
1) Break it up into scenes using MonkeyTools, then transition between scenes either manually or using LayerMonkey.
2 Try working in sections and turning off the eyeballs of all the layers you're not working on.
3) You can also try working "offline":
A) Build a new Typemonkey project B) Undo the build after it's done, but leave the Marker layer. C) Move the markers so it syncs with your audio (try adjusting from the back to the front in small chunks...that way you don't start overlapping markers). D) Once you've got that synched, Re-build TypeMonkey using the Existing layer as your synch reference.
How can I pull back so all the text is visible at the end of animation?
The easiest way would be to insert a "phantom word" at the end of the animation- an extra word that you can reposition (pull forward in Z space, up on the Y axis, or whatever), then unshy the layers and turn it invisible (turn off the eye icon). You might want to move the end of the work area earlier so you have a hold at the end as well. You can find a quick tutorial here.
You can also adjust the dolly position in the panel of the Target Layer
I can't get the key commands to work
Try cutting and pasting this text string into the text box and see what happens:
[Using these brackets will put all your text on one line] {Using the curly brackets will stack them} And | using |the | pipe | key | will make all the words | come | on | as | one | word. ^^^ Carrot command will insert a pause^^^{You can also mix brackets [like this to give you more control] but you can't use curly brackets inside straight |ones| or | it| won't |work}
My camera rotates 360 degrees after I manually adjust the Y rotation of a control layer by more than 90 degrees.
Dan says: "I think that's a manifestation of the dreaded "gimbal lock" you can get when dealing with Euler angles (which is what AE uses). What's happening is that (x=0,y=90,z=0) and (x=180,y=60,-180) are two ways to represent the same orientation. Unfortunately, AE doesn't give expressions a way to easily derive the world orientation of a parented layer. The method I use works most of the time but it isn't perfect, and it is apparently coming up with the second version of the control layer's orientation, which causes the flip."
Orrin says: The best workaround I've found is to rotate the control 89 degrees, then set a 1 degree rotation keyframe for the camera to make up the difference.
Why are there no markers on my control layer and no animation in the comp when I use Marker Sync?
Make sure there are no markers on your marker sync layer that exist before the 0 point in the timeline. The Monkey's will always sync using the first markers it encounters on the layer. A simple way to correct it would be to cut the sync layer at the 0 point and use the Scene Maker in MonkeyTools to pre-comp and get rid of the unneeded markers.
______________________________________________
Since Kuler no longer allows you to downoad .ase files, theres a way you can create your own (there might be others- please send them along if you know of any)
1) In Illustrator, open up the Swatches window: (Windows/ Swatches)
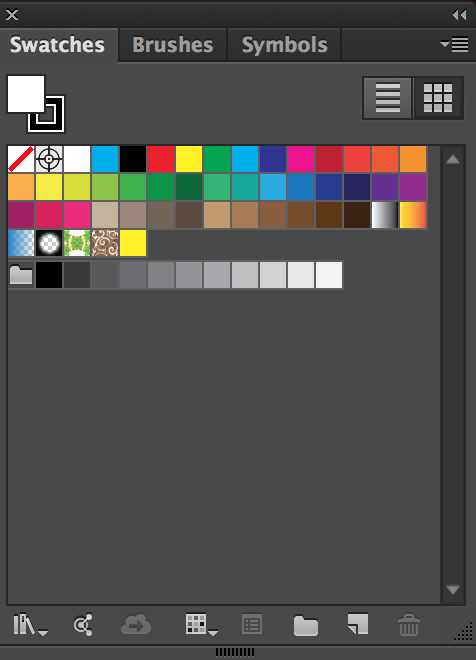
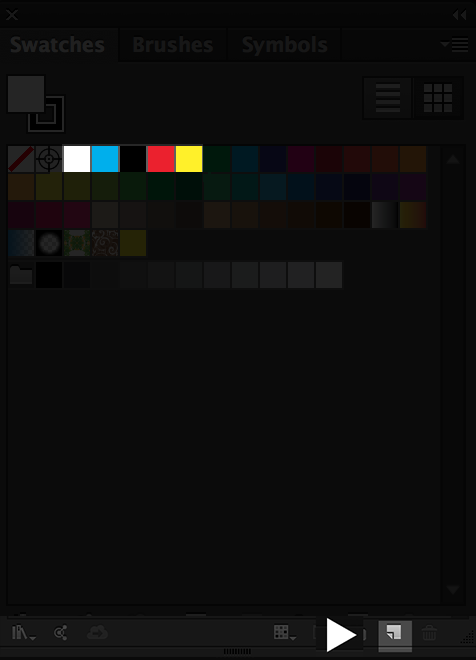
2) If there is a library loaded, you can select each of the first 5 colors and click on the new color icon at the bottom of the window to edit the colors to the ones you want to save to as an .ase. (The first 2 color boxes are reserved for none and the registration mark and will be ignored by the .ase file). If theres no colors saved in the library you can just follow the same steps starting with the new color icon.
.ase files contain a maximum of 5 colors, but you can have less as well.
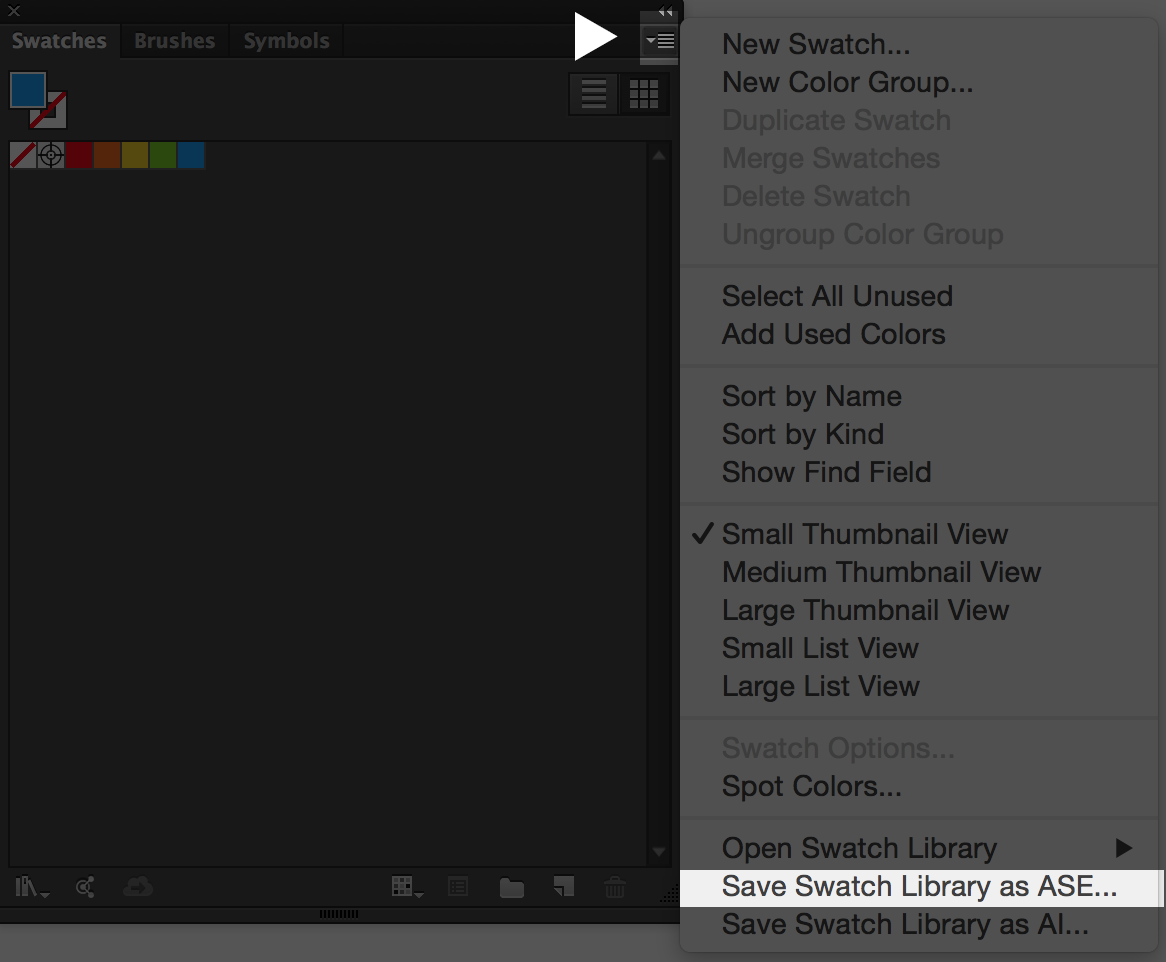
3) Click the button at the top right of the window revealing the list of commands. At the bottom of the list theres "Save Swatch Library as .ase". Click that and save where you can easily access it.
Also, heres a few links you can download .ase files - please send us additional links to post if you know of others:
2 Color Combos: http://www.designbolts.com/2015/12/19/10-best-2-color-combinations-for-logo-design-with-free-swatches/
3 Color Combos: http://www.designbolts.com/2015/12/24/10-best-3-color-combinations-for-logo-design-with-free-swatches/
http://www.designbolts.com/2015/12/29/8-awesome-color-combinations-for-your-2016-graphic-design-projects/
http://blog.graphicleftovers.com/8-trendy-color-palettes-with-free-adobe-swatch-exchange-files-ase/
http://veerle.duoh.com/inspiration/
The dropdowns in the UI are getting cut off: Click here for more info